
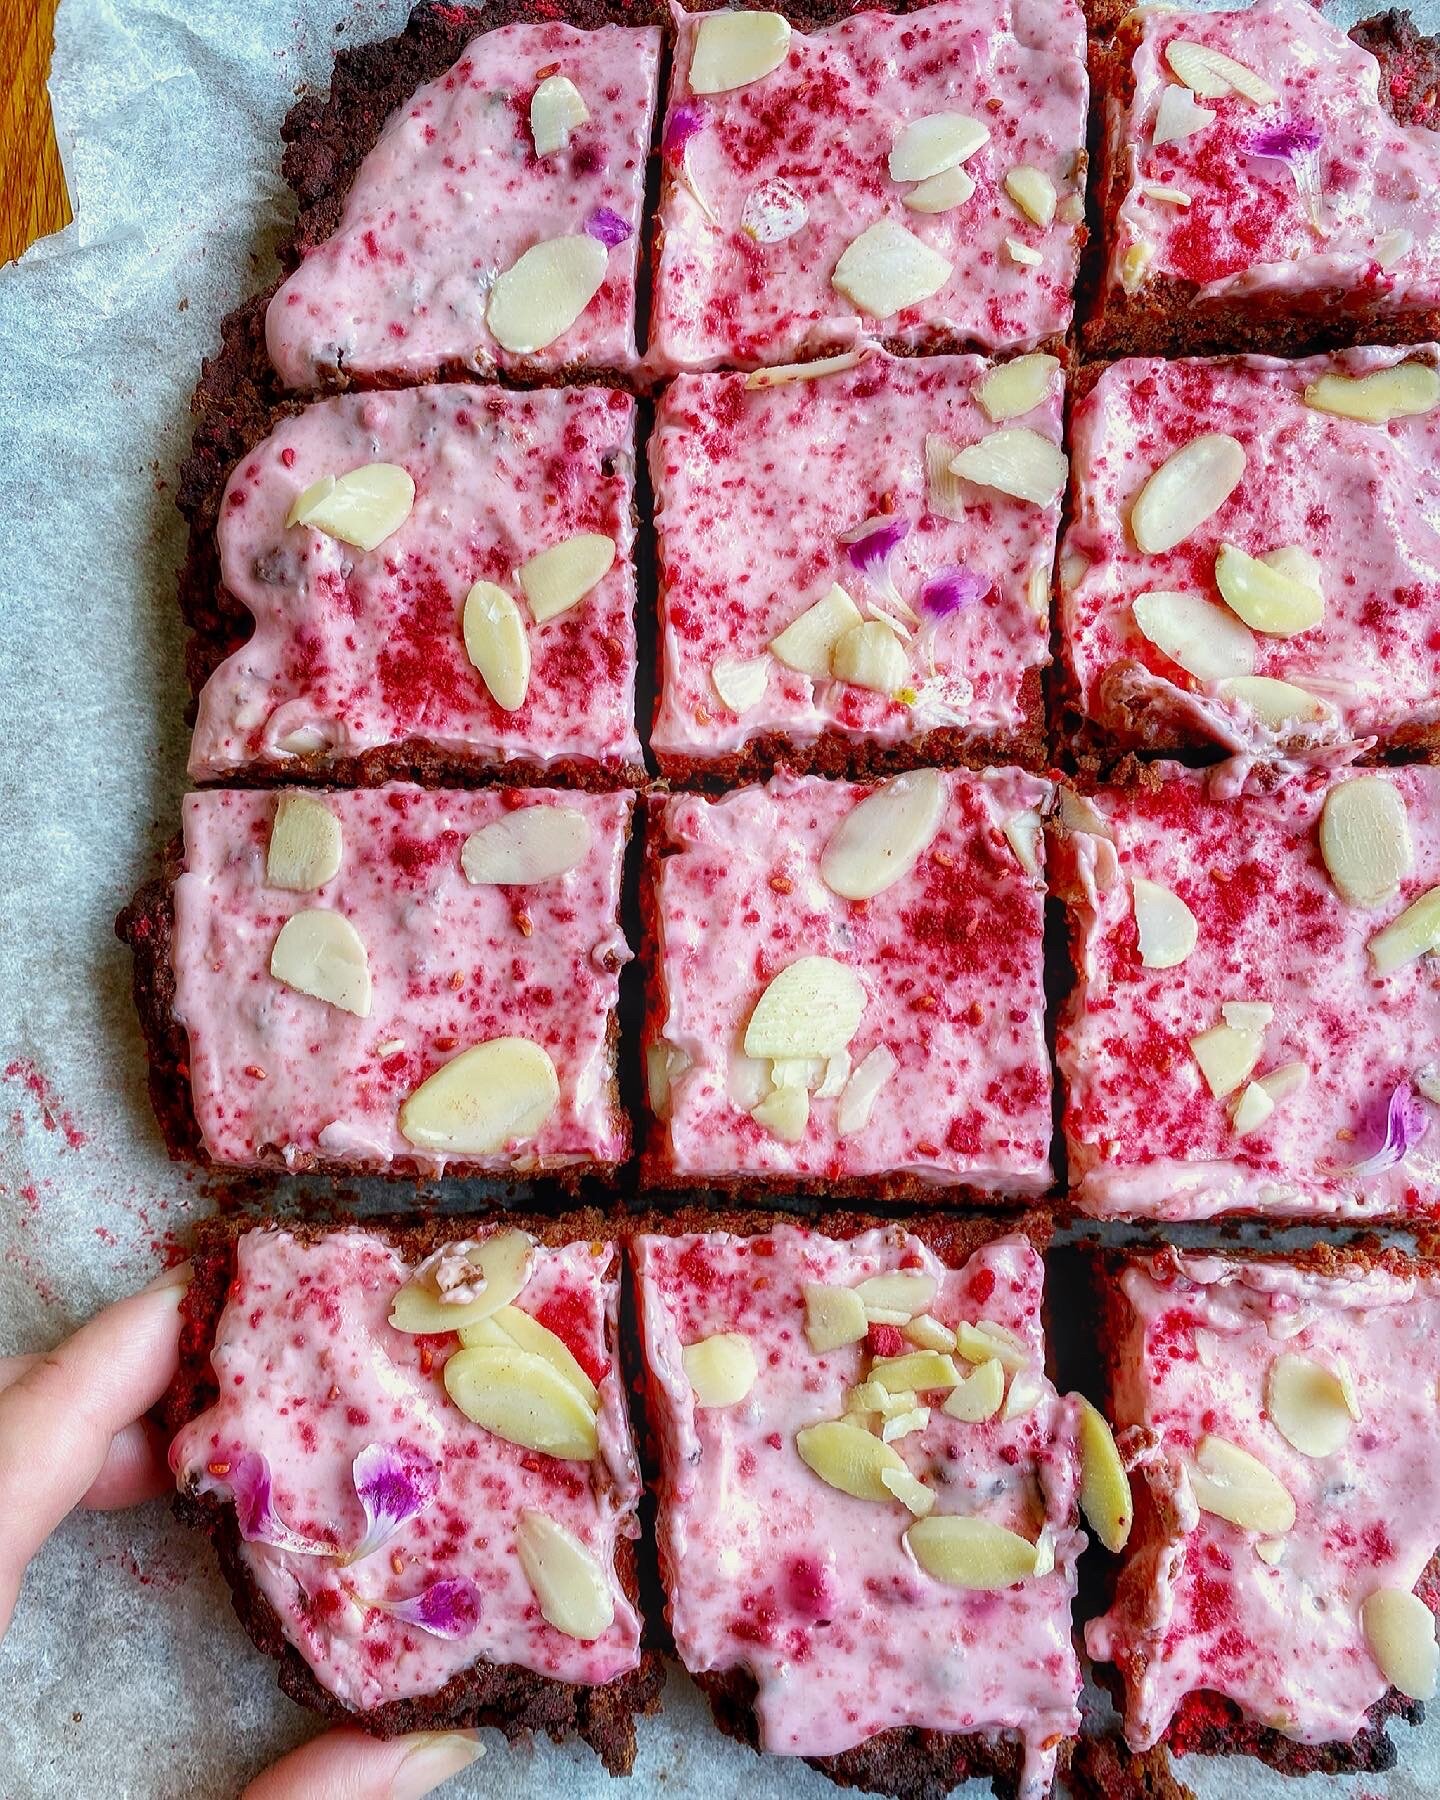
Vegan Choco Beet Cake With Pink Almond Frosting
Today I share with you a yummy cake idea which is incredibly easy to make, it’s delicious, healthy, pretty and will be sure to impress anyone!
Vegan gluten-free & sugar-free chocolate & beetroot sheet cake with a fresh almond yogurt frosting made naturally pink using freeze dried raspberry powder.
Decorated with more dried freeze raspberry powder, almond flakes and a few petals from garden flowers. What’s not to love about it, right?
The frosting is optional but it went so well with the chocolate base!
The kids loved the look of this, especially my pink lover daughter!
This is perfect for this time spring or summer dessert as you can store it in the fridge already cut into slices and can take it out for a fresh chocolatey bite whenever you need that quick pick me up!
It’s also a great quick dessert to offer if you have guests over!
Ingredients for about 12 squares:
200gr self-raising gluten-free flour
150gr cooked beetroot mashed
140gr erythritol
100gr dark chocolate buttons melted
30gr cocoa powder
130ml vegetable oil
50ml almond milk
1 tbsp crunchy peanut butter
Optional vegan frosting
4 tbsps almond yogurt
2 tbsps vegan almond cheese spread
2 tsps erythritol
2 tsps freeze dried raspberry powder
Preparation: 10 minutes Cooking: 30 minutes
Preheat the oven at 180 degrees.
Start by mixing the dry ingredients in a bowl (flour, sugar, cocoa powder). Then add all the wet ingredients at once and mix well.
Take a rectangular oven tray lined with parchment paper and transfer the mixture in it. Make it flat so that it’s equally distributed. Bake for about 30 minutes.
While your choco beet cake is in the oven, prepare the frosting.
In a bowl mix the almond cheese yogurt, with the sugar & the freeze dried raspberry powder. Keep chilling in the fridge.

Let the cake cool completely before adding the yogurt frosting on top.
Cover all the cake with it then you can add some decorations like almond flakes, more raspberry powder and even petals.
Cut into 12 squares and store in the fridge for a good 30 minutes before eating it.
You can store it in the fridge in an airtight container for up to 3 days.
Enjoy!😋


Vegan Strawberry Heart Muffins
Valentine day is approaching and it’s always so much fun getting ready for it.
Chocolate and hearts are a must on Valentine’s Day and that’s why I decided to create a treat which has both in it. A heart shaped muffin with a delicious chocolate heart filling. Nothing screams more Valentine than this, right?
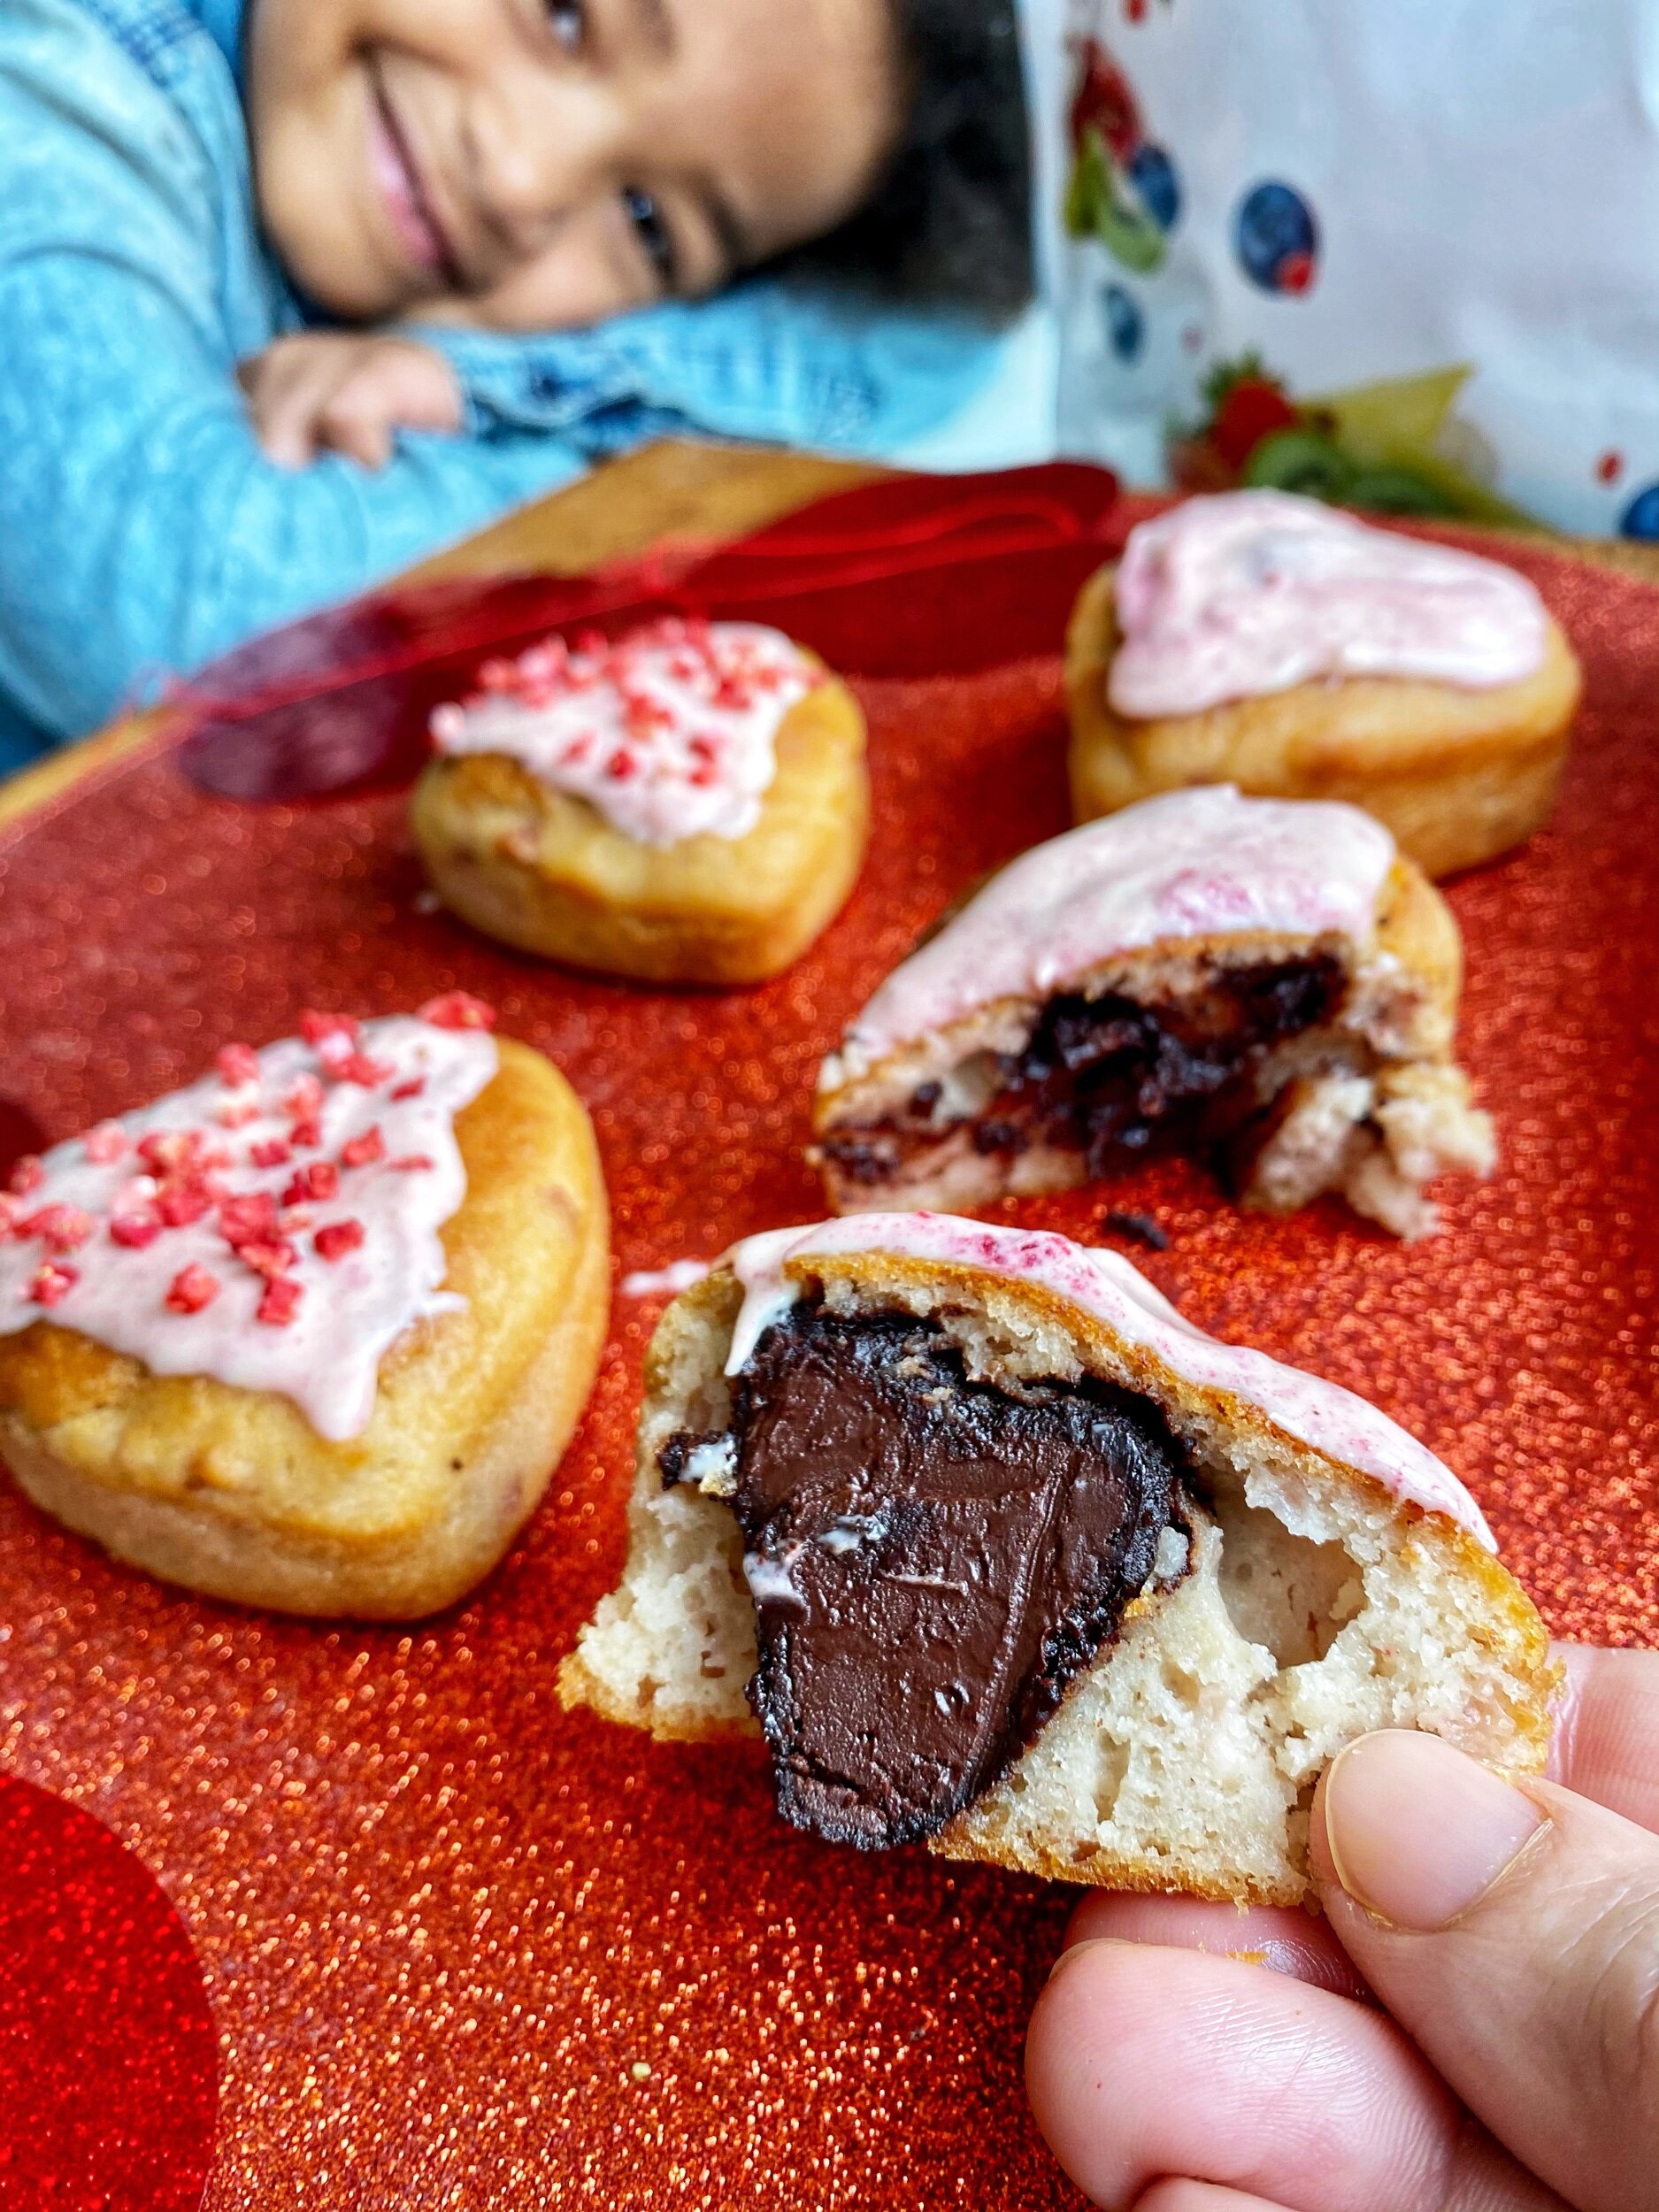
Son couldn’t wait to grab one muffin too!
Yet I can reassure you that this is actually a healthy treat while being super moist and delicious.

Daughter loved the chocolate filling so much!
Ingredients for about 8 muffins
60ml vegetable oil
150gr ground almonds
150gr self-raising gluten-free flour
200ml almond milk
2 tbsps lemon juice
4 tbsps maple syrup
1/2 banana mashed
pinch salt
1/2 tsp bicarbonate of soda
100gr fresh strawberries cut into pieces
Preparation: 10 minutes Cooking: 20 minutes
Start by mixing the oil, milk, lemon juice, the mashed banana, maple syrup, salt and ground almonds.
Now add the flour and bicarbonate of soda. Mix well, then gently fold in the strawberries cut into pieces.
Put the mixture in the heart shaped muffin mould.
Fill it halfway if you decide like me to add the chocolate filling. This is optional and you can do so by freezing some chocolate spread in the freezer for a couple of hours before. I’ve chosen to give it a heart shape by using a heart shape ice cube tray. Place your frozen chocolate heart in the middle of the muffin heart mould standing up rather than being flat. That way when you cut your muffin from the top to the bottom you will see the cutest chocolate filling ever in a heart shape!
Bake in preheated oven for about 20/25 minutes at 180 degrees.
I’ve decided to cover them in white chocolate naturally coloured pink by using freeze dried strawberries powder and sprinkling some freeze dried strawberry pieces too.

The perfect Valentine’s muffin!
These muffins are best eaten warm but they can last a few days if stored in an airtight container.
Buon appetito!
Other great Valentine ideas using strawberries here

Give a look at that bite!

Candy Cane Biscuits
What an amazing cook-along session we had making these candy cane biscuits on zoom and Insta live!🤩 And we have seen so many delicious biscuits made by the mini chefs in the session!
You will be able to watch a collage of the best moments very soon and hopefully it will help you making these cookies by yourself if you didn’t manage to join us live.

The kids loved making these candy cane biscuits!
These delicious candy cane biscuits are the perfect Christmas treat, right?

Here are the biscuits before going in the oven
Ingredients:
110gr sugar or your favourite sweetener - I’ve used erythritol
110gr butter - my preference is vegetable spread, soft at room temperature
1 teaspoon peppermint extract
1/2 teaspoon vanilla extract
Pinch of salt
1/2 egg
175gr plain flour

Here they are! Ready to be eaten!
Start by mixing the butter and sugar in a bowl.
Then add peppermint extract, vanilla extract, pinch of salt, 1/2 egg. Mix well then add the flour.
You will end up with a dough soft & flexible. Divide the dough in 2 parts and add some red food colouring in one half.
Let both parts chill in the fridge for good 20 minutes.
Once out of the fridge make little balls out of each dough. Each ball should weight about 8g.
Now it’s time to turn the balls into a rope. Make one red and one white and make sure that they have the same length. Attach them one another and start rolling until you get the candy cane pattern and slightly bend the top to give it the candy cane shape.
Move the candy canes biscuits on a baking tray and once made them all, transfer the tray in the fridge for 30 minutes. This is to prevent for the biscuits to expand too much.
Transfer to a preheated oven and cook at 170 degrees for about 10-15 minutes.
Enjoy!😊
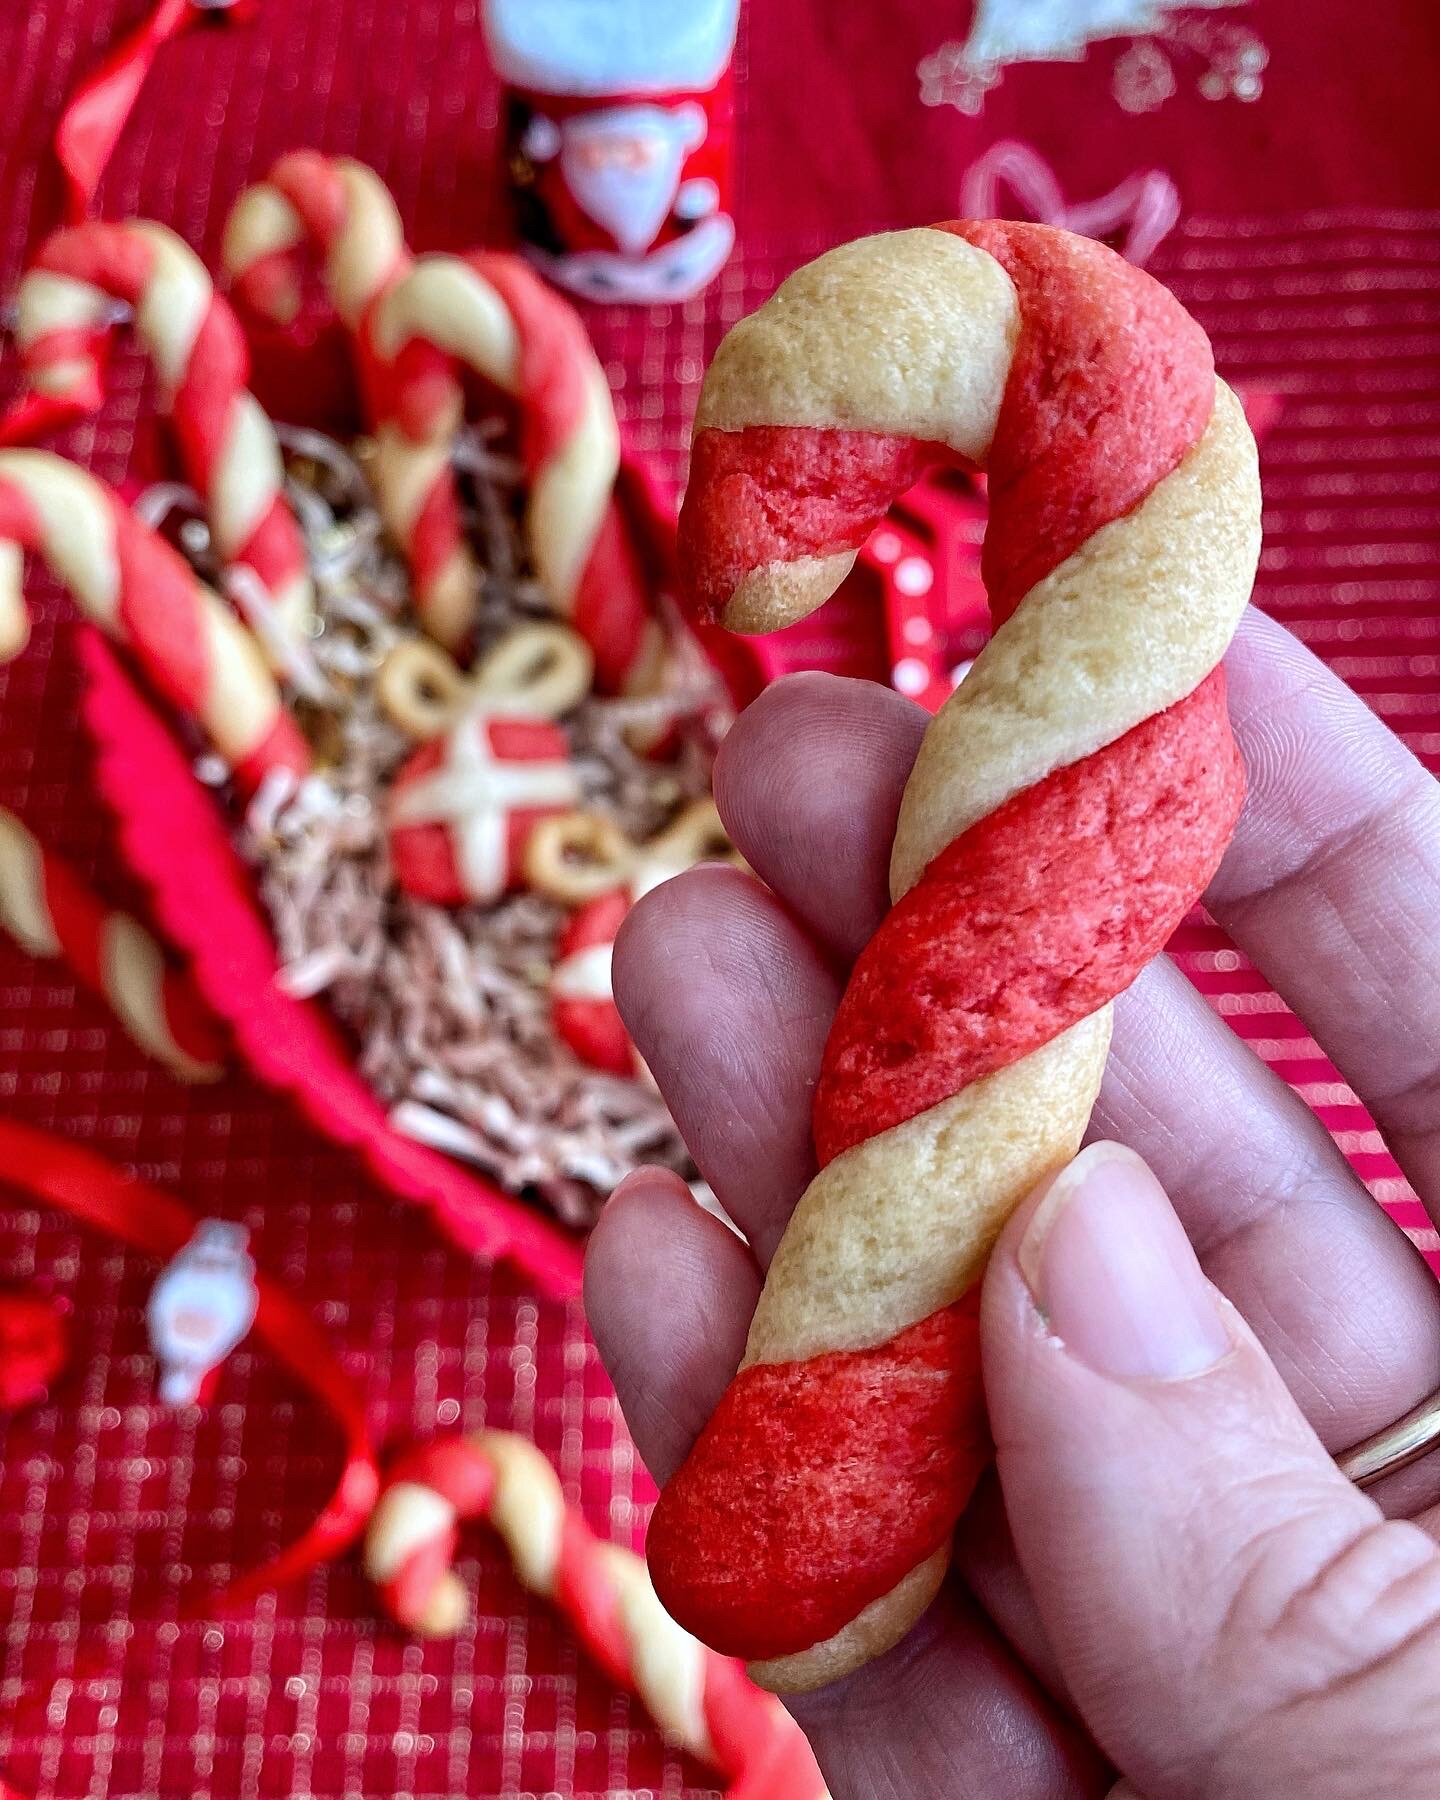
A closeup of this yummy candy cane biscuit

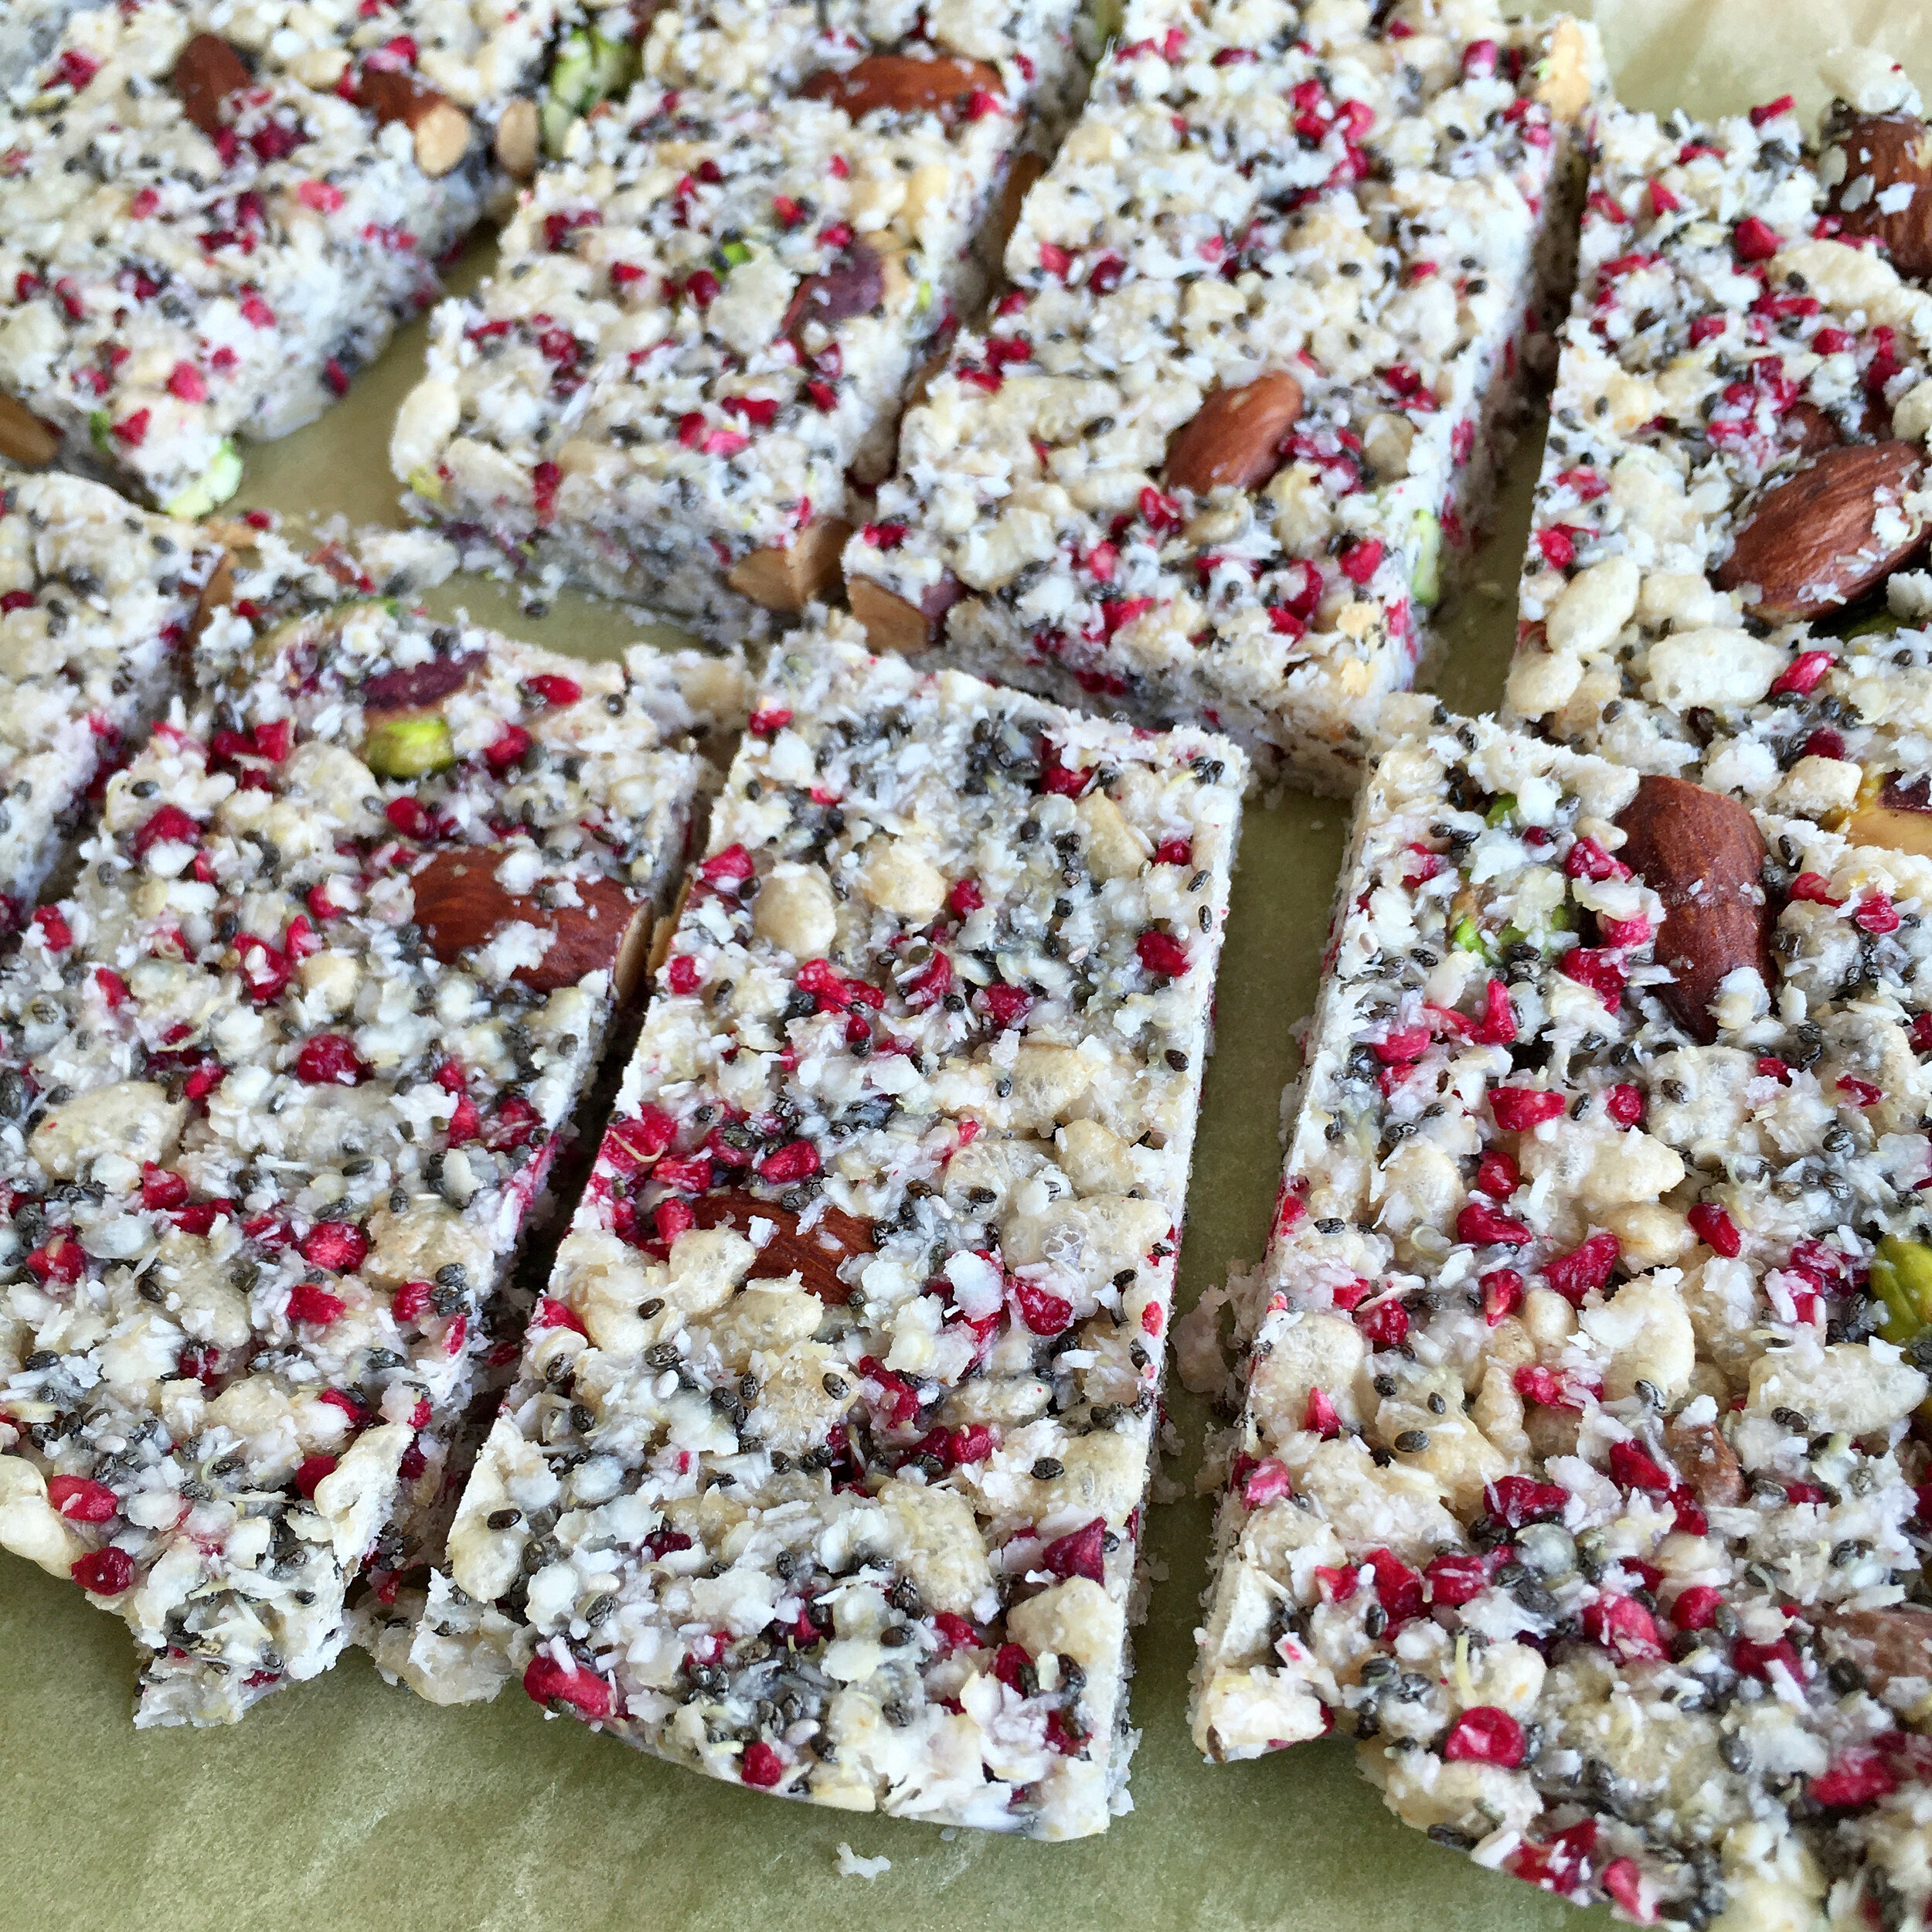
Healthy Pink Energy Bars
Looking for a healthy snack easy to make and super yummy?
This is the treat for you!
Here the kids loved mixing all the ingredients and making these pink bars full of goodness.
You can watch them making these bars here!
These bars are not only cute to see but super yummy to eat too!
Ingredients for about 8 bars
20gr desiccated coconut
40gr roasted almonds
20gr pistachios
20gr chia seeds
30gr quinoa flakes
20gr puffed rice
70gr coconut oil
For the coating
50gr white chocolate
sprinkle chopped pistachios
Preparation:15 min - Freezing: 35 min
Take a bowl, measure your ingredients and mix them all together.

The mix is in a tray and it’s going in the freezer
Take a rectangular baking tray, line it with parchment paper and cover it with your mix. Flatten it properly so that it’s equally distributed.
Transfer it in the freezer for about 20 minutes, take out and cut into bars.
The energy bars are cut
Prepare the coating by melting the white chocolate in a small pan on top of another one filled with water. Once it’s melted add the raspberry powder and mix well to turn it into pink.

The bars have been coated with pink chocolate
Drizzle it on top of your bars and sprinkle extra toppings if you like. We have used some chopped pistachios!

A close-up of these yummy pink bars!
Return to the freezer for another 15 minutes so to help the coating to set and then enjoy!
These pink energy bars are a perfect snack or a guilt-free treat for both big and small!
Buon appetito!😋

The bars are sprinkled with chopped pistachios

A close-up if the pink energy bar

The kids were super happy with the result!

Sbriciolata With Cream Patissiere, Strawberry Jam & Amarene Cherries
This is definitely one of our favourite cakes! And it's so quick & delicious, it's always a hit with both big and small!
I normally use this pasty base as a quick cake with guests or whenever I visit friends and fill it simply with jam.
This time I went a step further and filled it with Italian style dairy-free cream patissiere, jam and cherries! Soo good!
Ingredients for a round cake tin (9 inch)
Pastry:
150gr self- raising brown flour
150gr self- raising white flour
100gr brown sugar
100ml vegetable oil
1 egg
1 spoon dry freeze strawberry pieces (optional)
Cream patissiere
500ml soy milk
2 eggs
50gr flour
50gr brown sugar
zest 1/2 lemon
1 spoon dry freeze strawberry pieces (optional)
Extra toppings
almond flakes
Puffed rice
Preparation:15 min - Cooking: 30 min
Start by gathering the ingredients for the cream. I use the thermomix as it's not only a food processor but a cooker too. I add all the ingredients inside, (except for the dry freeze strawberries which are added in the cream after its cooked) and cook for about 10’ or until the cream turns thick and then let it cool down for 5’.
While the cream is cooking, take a bowl and mix all the ingredients for the base. The result would be a crumbly dough.
Take a round cake tin lined with parchment paper and put half of the crumble at the bottom. Use your hands to flatten it and make it compact.

The base of the sbriciolata is ready!
Now add a layer of jam, pour the cream, top it with amarena cherries, almond flakes & puffed rice. Put the rest of the crumble on top and make it compact using your hands.
Add extra almond flakes and puffed rice if you like. Cook in pre-heated oven at 180 degrees for about 30’ or until it turns golden. The crust should be super crunchy in contrast with the softness of the filling.
Let it cool down so it becomes even crunchier.
I normally opt for the fastest version which is filling the crumble simply with jam. Adding cream patissiere inside is a slightly longer process but so worth it! Both versions are always a success!

The sbriciolona is out of the oven!
Buon appetito!😋

Top view of the sbriciolona!

The sbriciolona is so delicious!
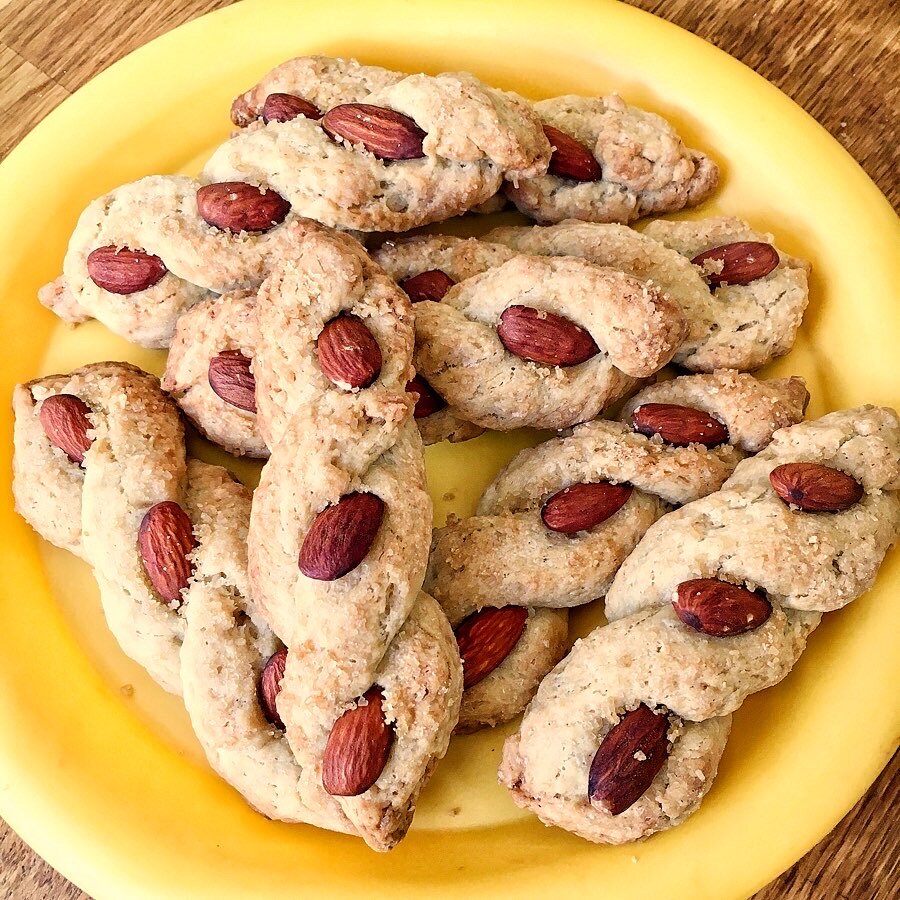
Intorcinati Pugliesi: My Childhood Cookies
Today I’m so excited to share with you the recipe of one of my absolute favourite childhood biscuits.
They can be called trecce, intorcinati, intorchiate, all names refer to the braid like shape of these biscuits, and they are typically from Puglia, the beautiful region where I'm from in Italy.
The ingredients are incredibly simple and typical of a Mediterranean cuisine, yet these biscuits are incredibly addicting! Must be because of the wine in them? Possibly!🤪
Are you ready to get baking?
Ingredients for about 12 biscuits:
250 plain flour
75 gr brown sugar
75 gr extra virgin olive oil
75 ml dry white wine
pinch of salt
For the decoration:
3 almonds per biscuit
1/2 cup of granulated sugar/brown sugar
Preparation: 30 min Cooking: 20/25 min
Start by measuring all ingredients and place them in a mixing bowl all together: flour, sugar, oil, wine.
Mix with your hands until you get a dough soft and elastic but not sticky.
Let it rest in the bowl covered with a towel for about 20 minutes.
Then pick the dough and start making intorchiate by rolling a bit of dough into twisted shape.
Line a flat baking tray with parchment paper and preheat the oven at 180 degrees.
Divide the dough into 24 approximately equal pieces. Roll 2 pieces of dough with the palms of your hands against a flat surface to make them into a rope shape of about 12cm. Pinch one end of the rope together with one end of the other rope, then twist the two ropes around one another to form a twist, with the dough strands crossing twice and meeting at the bottom to form three spaces. Press the ends together at the bottom to seal them. Continue forming the twists until you have filled the baking tray with 12 cookies.
Press three almonds into each cookie and sprinkle some sugar.

The intorchiate are ready to go in the oven
Transfer the intorchiate into the oven and cook for about 20/25 minutes or until they turn golden in colour.

The intorchiate are out of the oven!

the intorchiate cookies are sooo comforting!
I love to have these biscuits for breakfast and they are great dipped in coffee, in perfect Italian style!

These yummy biscuits are perfect with coffee
They can last up to 2 week in a airtight container but in this household they don't last more than 2 days!😁 I wonder why!
Buon appetito!😋

You can store intorcinati in an airtight container and they can last up to 2 weeks

The intorchiate biscuits are kids friendly. My son loves them!

Vegan Sweet Potato Brownies
Brownies are definitely a favourite treat here, however it's hard to find healthy versions outside of our home.
That's why whenever possible we make our homemade versions and over the years we have been trying various combos.
Honestly at the beginning I wasn't sure that we could make a yummy brownie which could also be healthy but this vegan sweet potato version is the living proof that healthy yummy brownie is possible!
These brownies are vegan, dairy-free, eggless, refined sugar-free & kids friendly!
They were made entirely by the kids and you can watch their fun cooking video by clicking below!
They kids were totally involved in the preparation and were so proud of the final result! Son even said that people should eat brownies every day for breakfast, lunch & dinner 🙊 you definitely need to watch their video till the end, you will laugh a lot!😁
Ingredients for about 12 brownies:
3/4 cup sweet potato cooked and mashed
1/2 cup cocoa powder
1/2 cup coconut sugar
3 tablespoons agave nectar
2 tablespoons crunchy peanut butter
2 table spoons choco hazelnut spread
1/2 cup self-raising brown flour
Handful chocolate chips
2 spoons macademia oil
2 spoons hazelnut milk
Preparation: 30 min - Cooking: 15/20 min
Start by oven cooking 2 small sweet potatoes cut in half. Do some small cuts to accelerate the cooking. Oven cook at 180 degrees for about 20 minutes or until soft.

This is the light brown flour I’ve used for this recipe
Mash the sweet potatoes and transfer in a bowl.
Add all the other ingredients and mix well. We decided to put the choco chips only on top as decoration but you could also add them in the mixture.
Transfer the brownie dough in a rectangular oven tray and flatten it.

The brownie is out of the oven!
Cook in pre-heated oven at 180 degrees for about 15/20 minutes.
Let it cool down then cut into squares.

The brownie squares are ready to be eaten!
Buon appetito!😋

Kids were super satisfied with their yummy brownie!

Here is our yummy brownie tower!
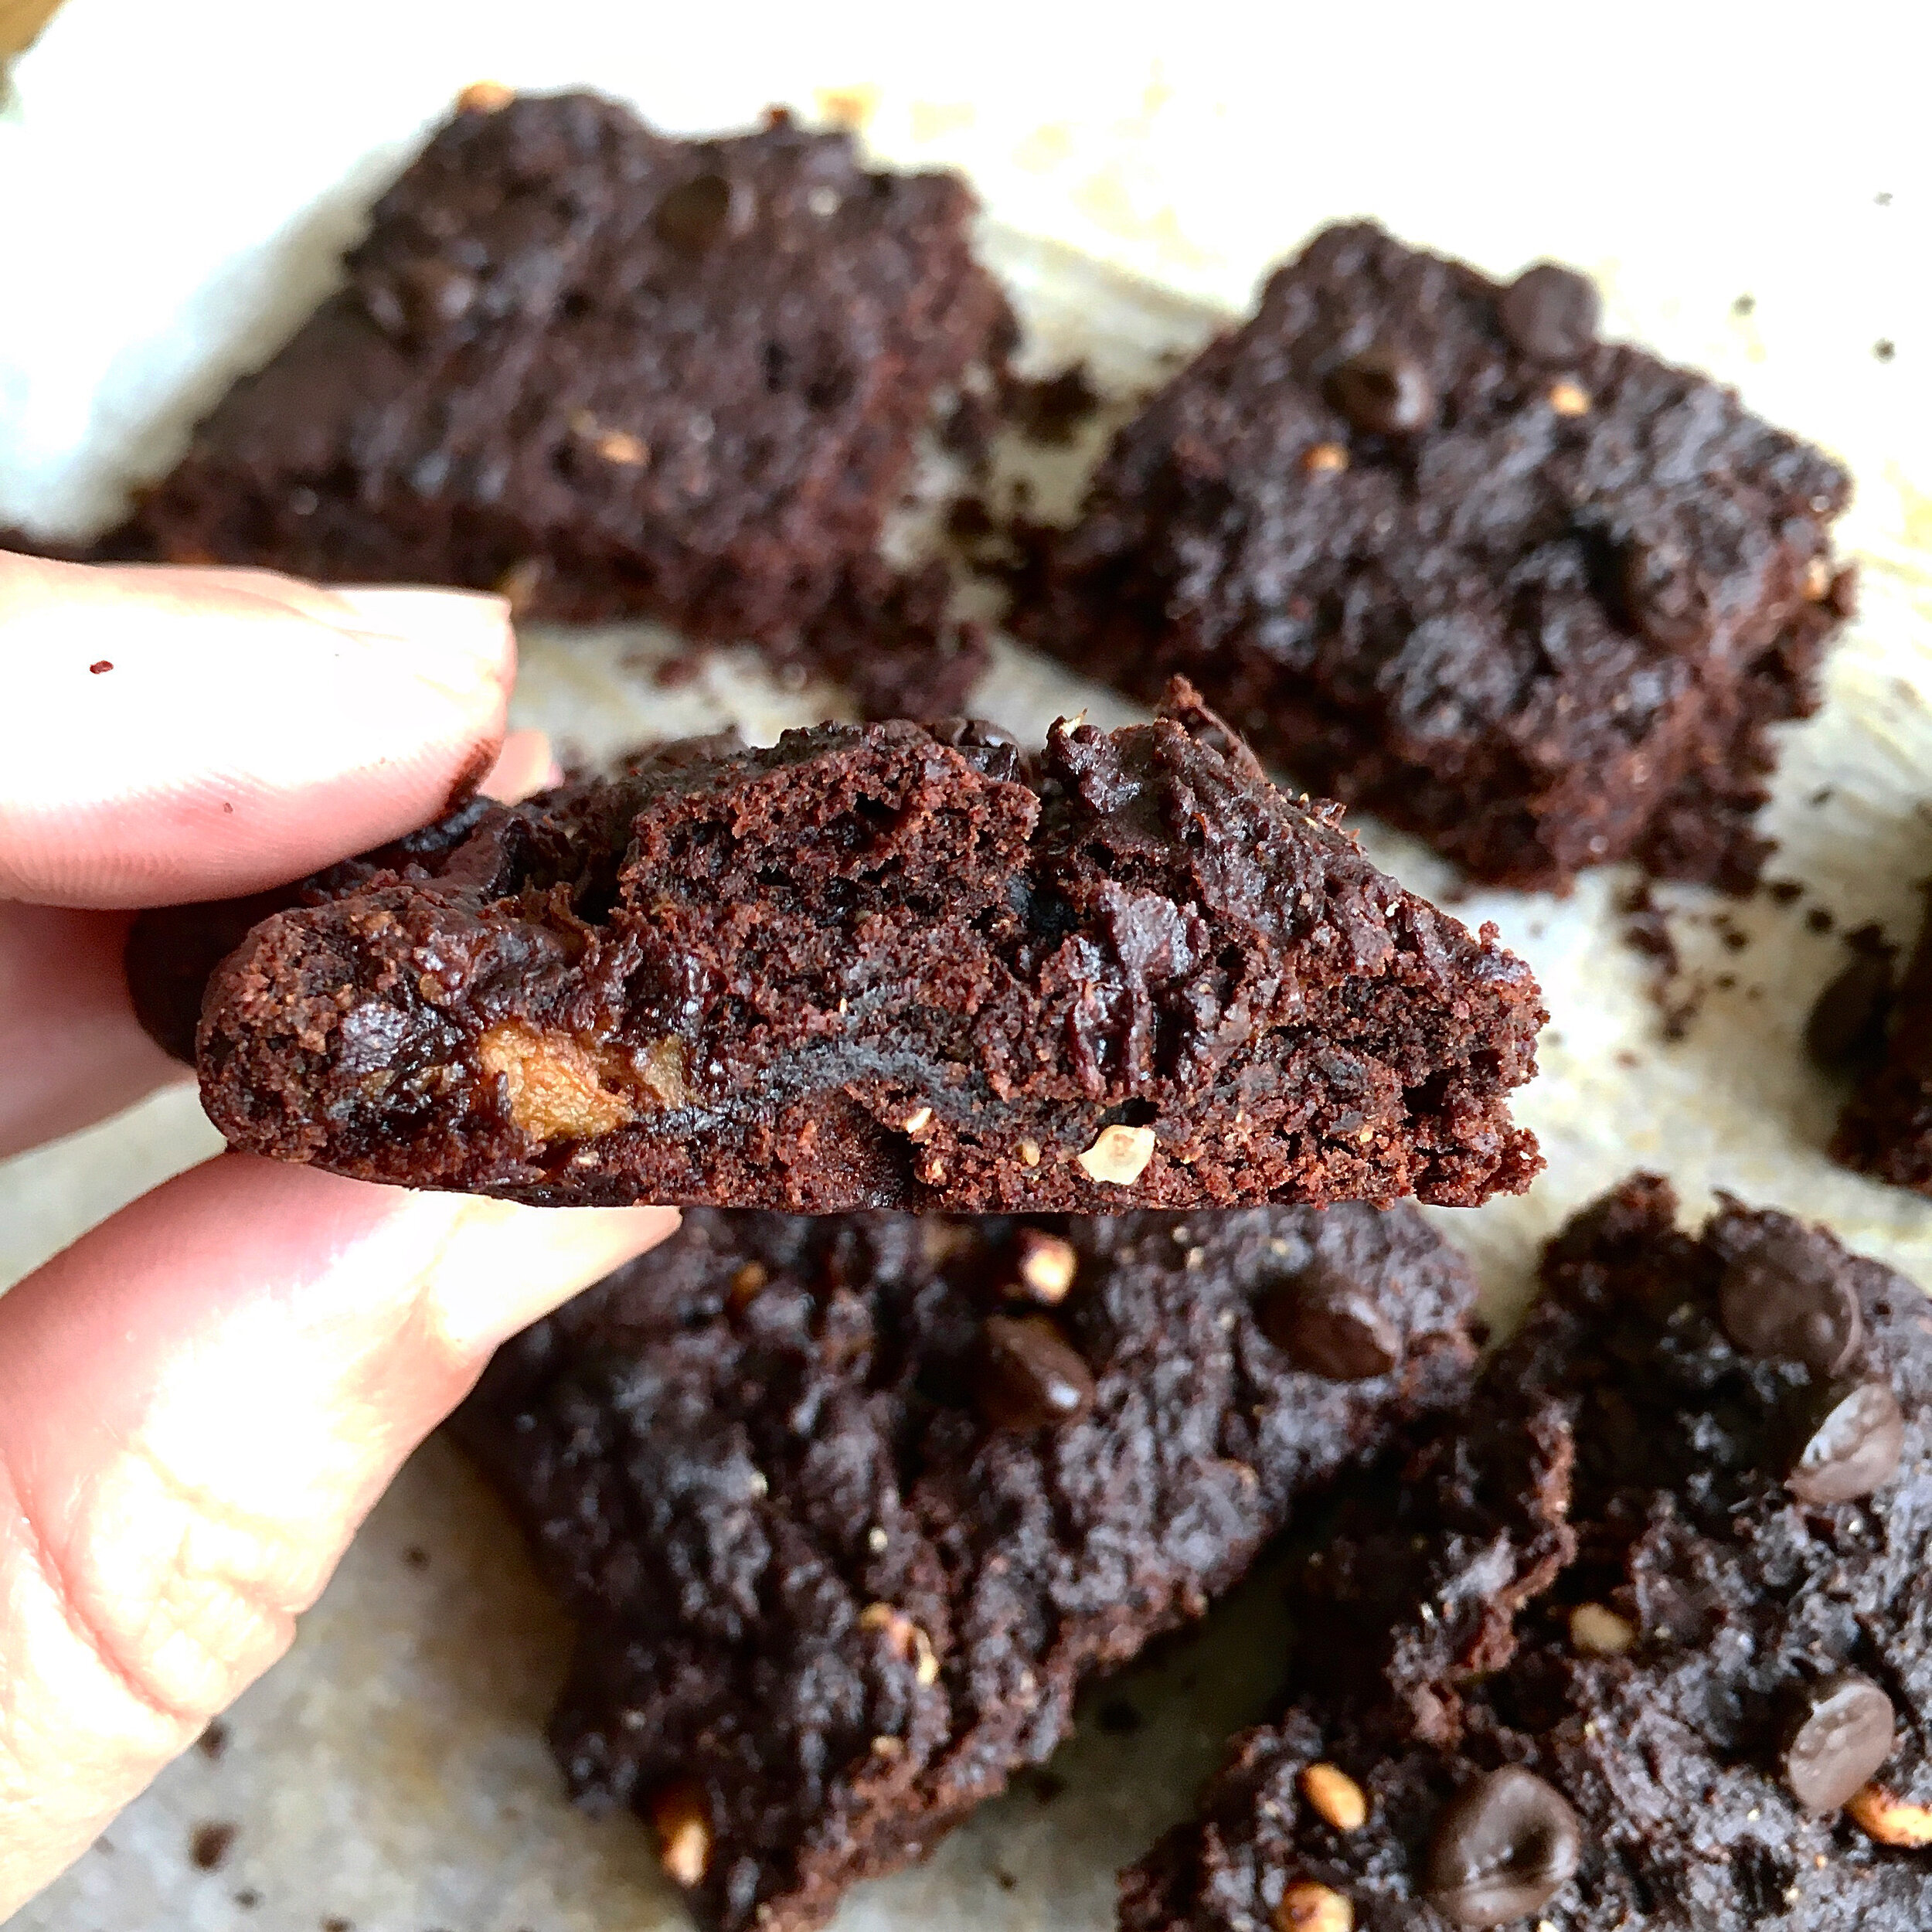
These brownies are crunchy outside and moisty inside!

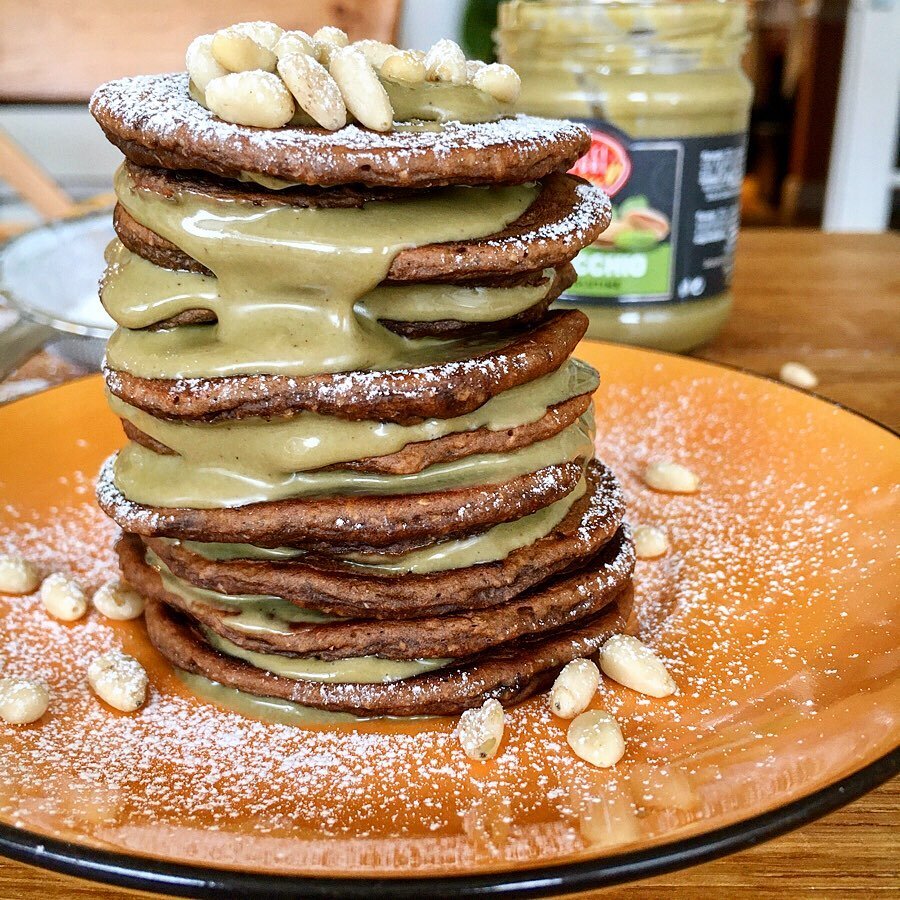
Sugar-free Banana & Kefir Pancakes
During these days of lockdown, pancakes are our favourite breakfast choice.
We have tried many combos and this is definitely one I can recommend.
These spiced banana & kefir pancakes are fluffy, healthy, refined sugar-free and totally kids friendly!
Ingredients for about 15 Pancakes
1 cup self-raising flour ( this can be replaced with gluten-free flour)
1 mashed banana
1 teaspoon ground cinnamon
1 teaspoon ground ginger
1 cup kefir (this can be replaced with white yoghurt)
2 teaspoons Protein vanilla powder
1 teaspoon Maca powder (optional)
1 egg
Date Caramel
1 handful of dates
1 teaspoon crunchy peanut butter
1 cup of water
Preparation: 10 min - Cooking 15 min
Mix all ingredients in a bowl then start pouring the mixture in a frying pan making little pancakes. Cover with a lid and wait to see bubble appearing. That tells you it’s time to flip over the pancake. Cook for a few minutes then take out. Repeat until you finish the mixture.
Prepare the date caramel by putting all the ingredients in a food processor.
Now stack the pancakes and alternate with the date caramel. Finish by sprinkling cinnamon & coconut chips.
Buon appetito!😋

Yummy banana & kefir pancakes are ready!

Delicious pancakes stack with date caramel!

Arianna loved making pancakes!
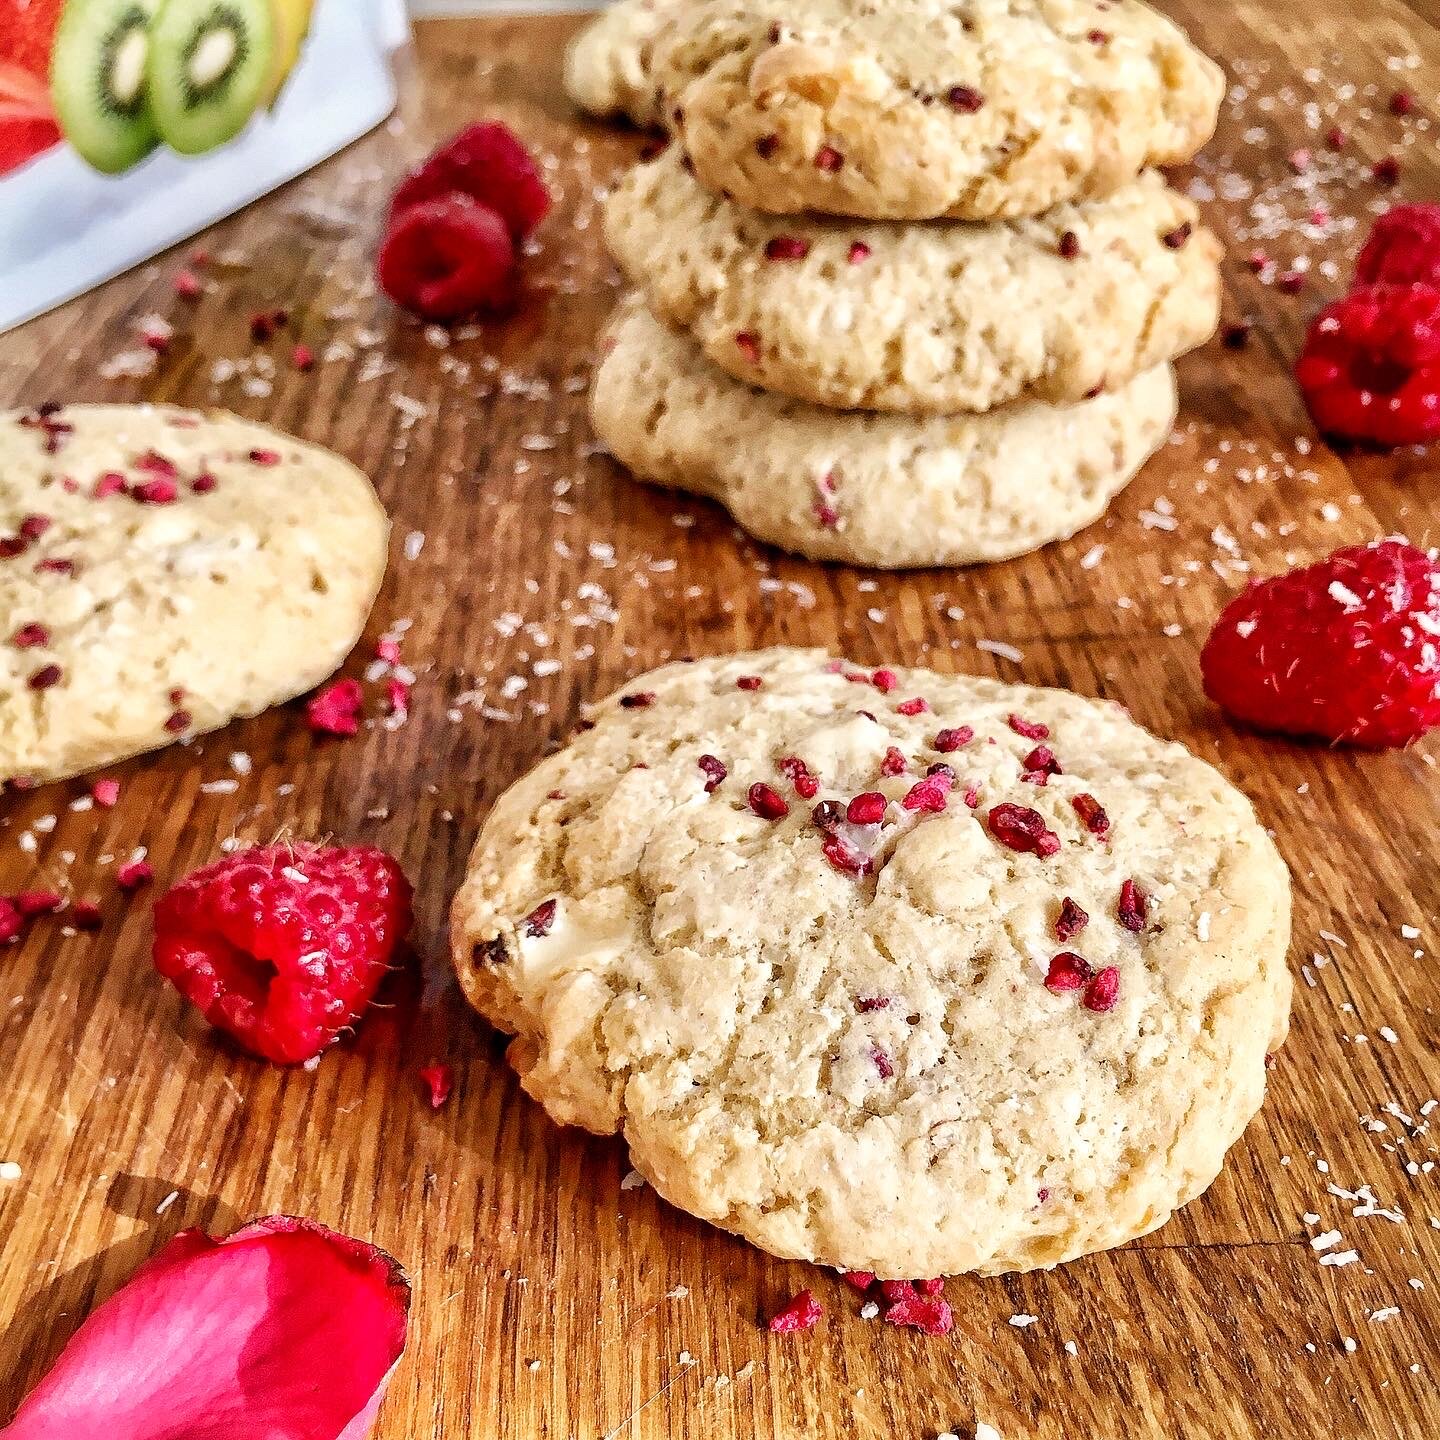
Coconut, White Chocolate & Raspberry Cookies
In isolation like now there is no better way of enjoying the time with the kids than doing some baking together.

The kids love freeze dried fruits! And these ones from HoneyBerry are so good!
Also homemade food is always the best, mainly if it's in a shape of a cookie 😋
Kids ask constantly for snacks so when possible we try to make our own. This way I know exactly what they eat and try to avoid too much sugar intake.
These cookies are so comforting, yet healthy as dairy-free & refined sugar-free.
The kids were totally involved in the preparation of these biscuits and were so proud with the result!
You can watch them making these cookies here!
Ingredients for about 18 cookies:
1 cup + 2/3 cup plain white flour (you can replace this with gluten-free which I finished!)
1/3 cup dessicated coconut
1/2 cup dairy-free butter
1/2 cup brown sugar or your favourite sweetener
pinch salt
1/2 teaspoon baking soda
1 teaspoon baking powder
2 teaspoons potato starch
1 egg
1/2 cup white chocolate chunks
1/3 cup freeze dried raspberries
Preparation: 20 min Cooking: 20 min
Start by mixing the dry ingredients in a bowl except for the chocolate and raspberries which will be added at the end. Once well mixed, put aside.
Now mix the wet ingredients in another bowl. First the sugar with the egg, then add the melted butter.
Transfer this mixture in the dry bowl, add the chocolate & freeze dried raspberries and make it into a dough.

Mixing all ingredients together!
Out of the dough, make little balls and position them on a baking tray lined with parchment paper. Then slightly flatten the balls down.

The cookies are ready to go into the oven!
Bake in a pre-heated oven at 180 degrees for about 20/25 minutes or until the cookies turn light golden in colour.
Buon appetito!😋

The yummy white chocolate & raspberries cookies are ready!

The kids can't wait to try the cookies! Just wait a minute to take a pic kids!

Arianna loved the delicious combo!

And Raffi too! You can see crumbles near his mouth!

Amaretto Choco Coffee Vegan Dessert
Calling all coffee lovers out there! You will simply LOVE this dessert. It’s healthy, nutritious and delicious!
I’ve always loved coffee, especially iced coffee during the hot summer days spent at the beach in Italy.
When it’s served with almond syrup then it becomes a delicacy and I just can’t get enough of it!
So while I was having all these nice visions, I came up with this dessert idea.
Ingredients for 2 big ice-cream bowls:
100gr chia seeds
600ml almond milk
Latte di mandorle aka almond milk syrup or sweetener of choice
3 teaspoons cocoa powder
4 teaspoons potato starch
2 espresso coffee small cups
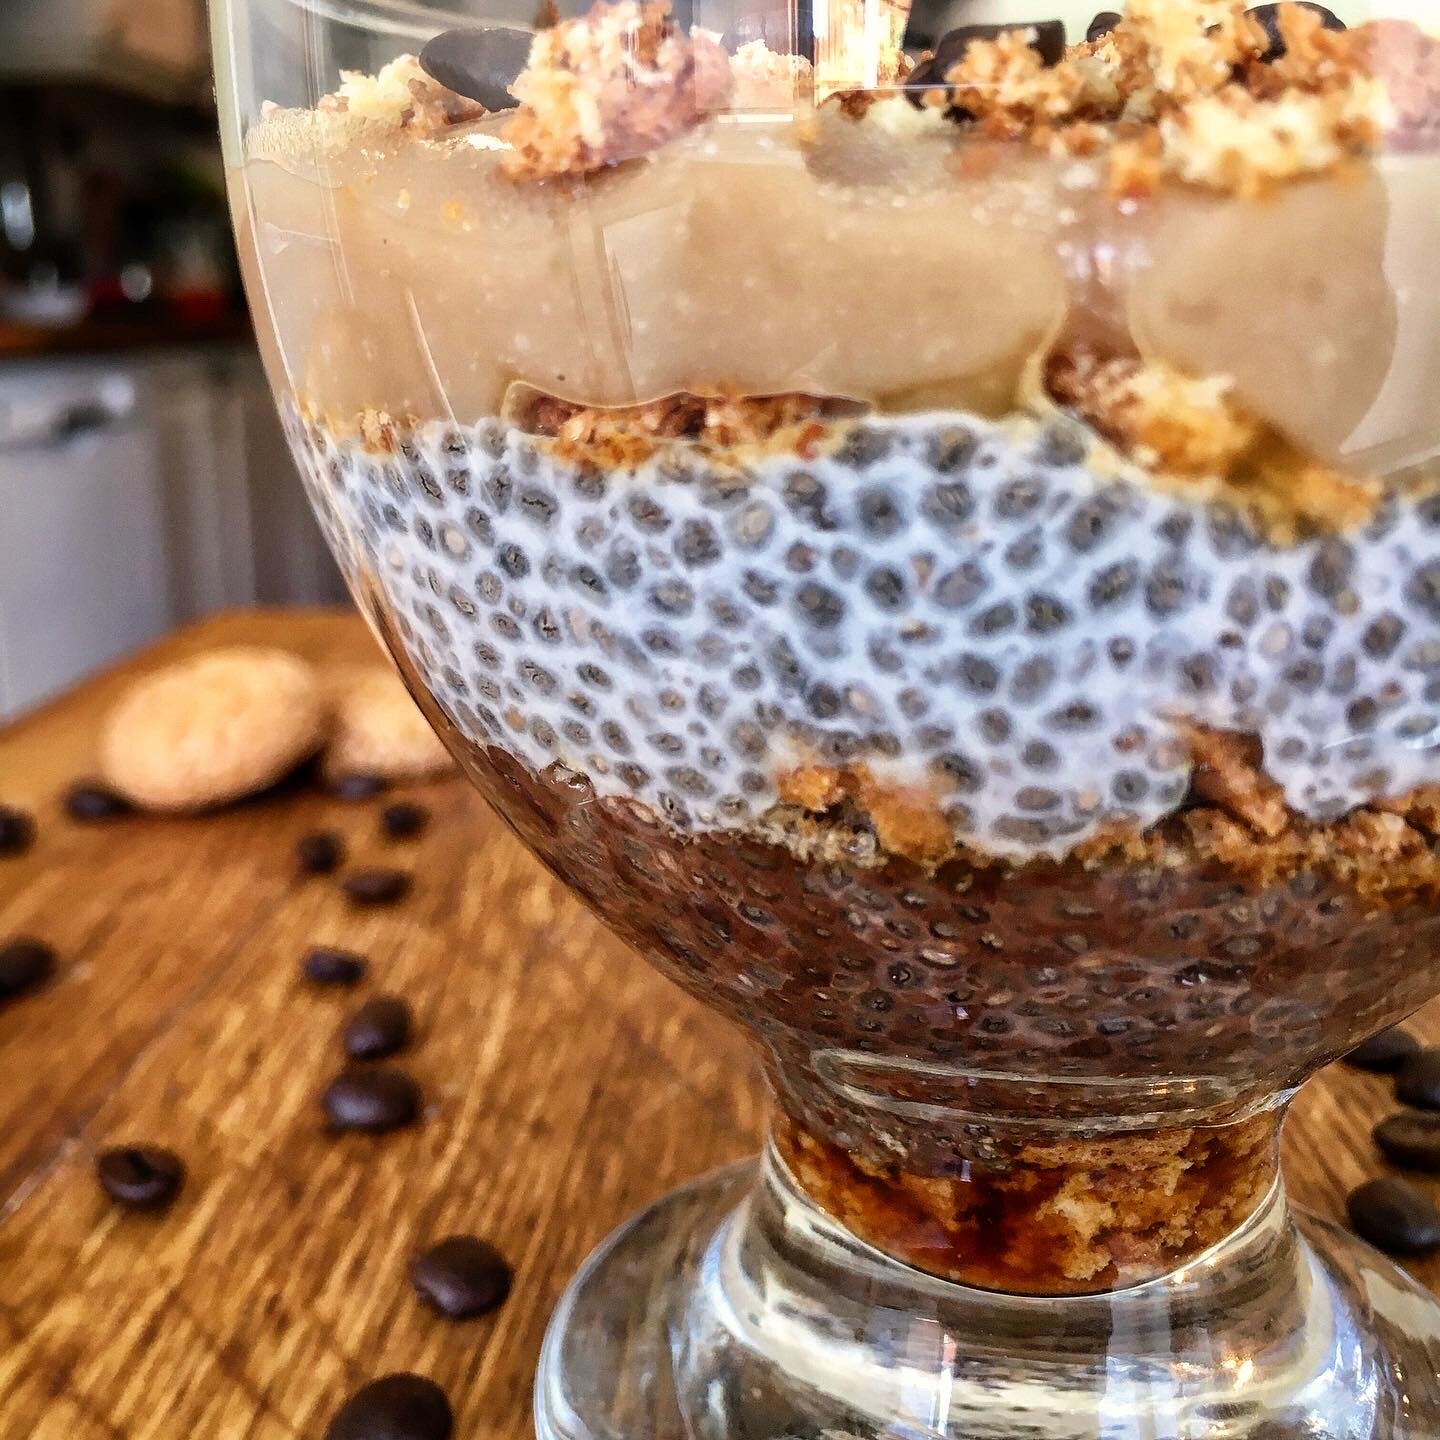
Look at all those layers!
Preparation: 20 minutes
The preparation starts the night before.
Take a small container and mix 50gr chia seeds with 100ml almond milk and 2 teaspoons of almond milk syrup or favourite sweetener.
Take another container and repeat the same process. However in this second container add the cocoa powder and mix well. I would also add an extra teaspoon of sweetener of choice.
Place both in the fridge.
Now prepare the coffee cream.
Take a small saucepan and add 200ml almond milk, 2 coffee espresso cups, 3 teaspoons of almond milk syrup and the potato starch.
Mix well at low heat until the mixture becomes creamy.
Let it cool down then store in the fridge.
In the morning you are simply ready to layer your dessert!😋
Cover the base of the bowl with 1 tablespoon of coffee at room temperature and sprinkle 1 amaretto biscuits crumbs.
Pour your first layer of chocolate chia seeds pudding. About 3 tablespoons. Add 1 teaspoon of coffee on top and sprinkle more amaretto biscuits.
Layer the almond chia seeds pudding, about the same amount as the choco one. Add more Amaretto crumbs and 1 teaspoon of coffee.
Cover everything with coffee cream, sprinkle more biscuit crumbs and some fresh coffee beans for decoration or a few choco chips if you prefer.

Amaretto biscuits and fresh coffee beans to finish it off!
You can enjoy this delicious dessert straight away as an alternative breakfast treat too. However it tastes better if put back in the fridge for a couple of hours for more chilling time. This way the coffee has the chance to sink in and the crumbs absorb better the coffee flavour. Both taste and smell will double their intensity!😋
Buon appetito!

Delicious vegan dessert!

Polenta & Almond Lemon Cupcakes
This is a great gluten-free refined sugar-free recipe which you will love!
I made these “fiery cupcakes” in theme with Arianna's costume for this year’s World Book Day.
She went into school dressed up as Ariana the firefighter fairy from the Daisy Meadows books so I made some fairy cupcakes with a fire element inside: strawberries!
They went down very well and both kids enjoyed them, mainly my youngest one.
Ingredients for about 12 cupcakes

The butter is ready to be poured in the moulds
100 gr corn flour
50gr ground almonds
50 gr potato starch
2 eggs
100gr melted vegetable spread
1 lemon zest
50 gr xylitol
30 gr Marple Syrup
12 fresh strawberries
1/2 teaspoon Baking soda
For the syrup
1 lemon juice
20gr Marple syrup
Optional topping
Almond flakes
icing sugar
Preparation:15 min - Cooking: 20 min
Take a bowl and mix together corn flour with ground almond, potato starch and baking soda.
Then add the eggs, lemon zest, melted vegetable spread, xylitol and Marple Syrup.

Son loved these cupcakes!
Mix well until you have a smooth butter.
Take your cupcakes moulds and pour about 2 spoons and half of butter in each of them. Then place the strawberry inside in a straight position with the pointy side slightly tipping out.
Repeat for all cupcakes and then cook for about 20 minutes in a preheated oven at 170 degrees.
As soon as they are out of the oven pour the syrup which you have previously prepared, then sprinkle almond flakes.
They are best eaten on the same day as they are super moist and fluffy.
Buon appetito!😋

Daughter loved these fiery cupcakes!

So moist and delicious!

Matcha Coconut Pancakes With Passion Fruit Curd
Another pancake experiment to celebrate Pancake Day!
Traditional pancakes are great but I love to try out new recipes and have my family to test my inventions.
This time I've decided to make some exotic pancakes and they turned out pretty good.
And the passion fruit curd was a real success!

Ingredients for about 20 pancakes
1 cup organic self raising brown flour
1/4 cup coconut sugar
1 egg
3/4 cup almond milk
2 spoons extra virgin olive oil
2 spoons dessicated coconut
2 spoons ricotta cheese
1 teaspoon matcha powder
Preparation: 5 minutes - Cooking: 10 minutes
Mix all ingredients in a bowl and spoon the mixture on a non-stick frying pan on a medium heat. Turn the pancakes occasionally until cooked.

Passion Fruit Curd Ingredients
4 passion fruits
40gr vegetable spread
35gr brown sugar
1 egg
Preparation: 5 minutes - Cooking: 10 minutes
Heat the butter and sugar in a small non-stick pan over moderate heat until sugar is dissolved. Then add the pulp and juice of the 4 passion fruits and the egg.
Lower the heat and stir continuously until lightly thickened.
Buon appetito!😋


Choco Avo Banana Pancakes
Pancakes are normally our Sunday breakfast way to go and we all love them!
I normally go with ordinary pancakes and simply do some variations on toppings, however with Pancake day approaching, I decided to go more adventurous and test my kids’ palates.
They don't normally like to eat banana & avocado, so I decided to hide them in these chocolaty pancakes.
The avocado was successfully disguised but not the banana. Daughter could still taste it! She was’t that happy until she saw the pistachio cream and then it was love at first sight!😁
Ingredients for about 20 pancakes
1 cup organic self-raising brown flour
1/4 cup coconut sugar
1 egg
1/2 banana & 1/2 avocado both mashed
1 cup almond milk
2 spoons extra virgin olive oil
3 teaspoons cocoa powder

The ingredients are in the bowl ready to be mixed!
Preparation: 5 minutes - Cooking: 10 minutes
Mix all ingredients in a bowl to make a smooth and thick butter.
Heat a non-stick frying pan over a medium heat.
Drop 4 generous tablespoons of the butter on the hot pan and leave to cook until large bubbles form on the top, for about 1-2 minutes, then flip them over and cook for another couple of minutes. Repeat until you finish the butter, greasing the pan each time.
Experiment with a variety of toppings! I highly recommend pistachio cream to go with these choco avo banana pancakes as it's truly delicious!
Buon appetito!😋

The choco avo banana pancakes are great eaten with a pistachio cream!
A close-up of the yummy pancake stack!

Vegan Choco Orange Doughnuts
Hello everyone,
I'm back on here with a super easy recipe that you will want to make over and over again!
If you like oranges and chocolate you will simply fall in love with these baked orange choco doughnuts!
They are easy to make. They are super healthy because they are oven baked rather than being fried. They are vegan friendly as no eggs or dairy products are involved in this recipe. Yet they are incredibly soft, moisty and delicious!
Would you like to give them a go?
Ingredients for 8 Doughnuts:
175gr self-raising white flour
70gr coconut sugar
60ml vegetable oil
100ml water
100ml orange juice
zest of 1 orange
50gr dark chocolate chips
Preparation:10 mins - Cooking: 20/25 mins
Start by mixing the orange juice with the oil and the water. Then slowly add the sugar and the flour to the mixture.
Finish by adding the orange zest and the choco chips.

The doughnuts mixture is ready!
Mix well, grease the doughnuts mould to prevent sticking and fill it with the mixture.

The mixture is in the doughnut mould,
Bake in pre-heated oven at 180 degrees for about 20-25 minutes.

Here the doughnits are just out of the oven! they smell heavenly!
These doughnuts are best straight out of the oven as they will be so soft and moisty and the smell of orange will be all over you!
For all these reasons these yummy doughnuts don’t get to see the end of the day in this household and I predict the same it would happen in yours too!😁

My little boy is the biggest eater of these doughnuts!
They are great stored for up to 3 days in an airtight container and freeze extremely well too!
Buon appetito!😋

And then a drizzle of nutty honey to add sweetness to it!

So delicious! After a few bites son had to eat all the orange slices too!

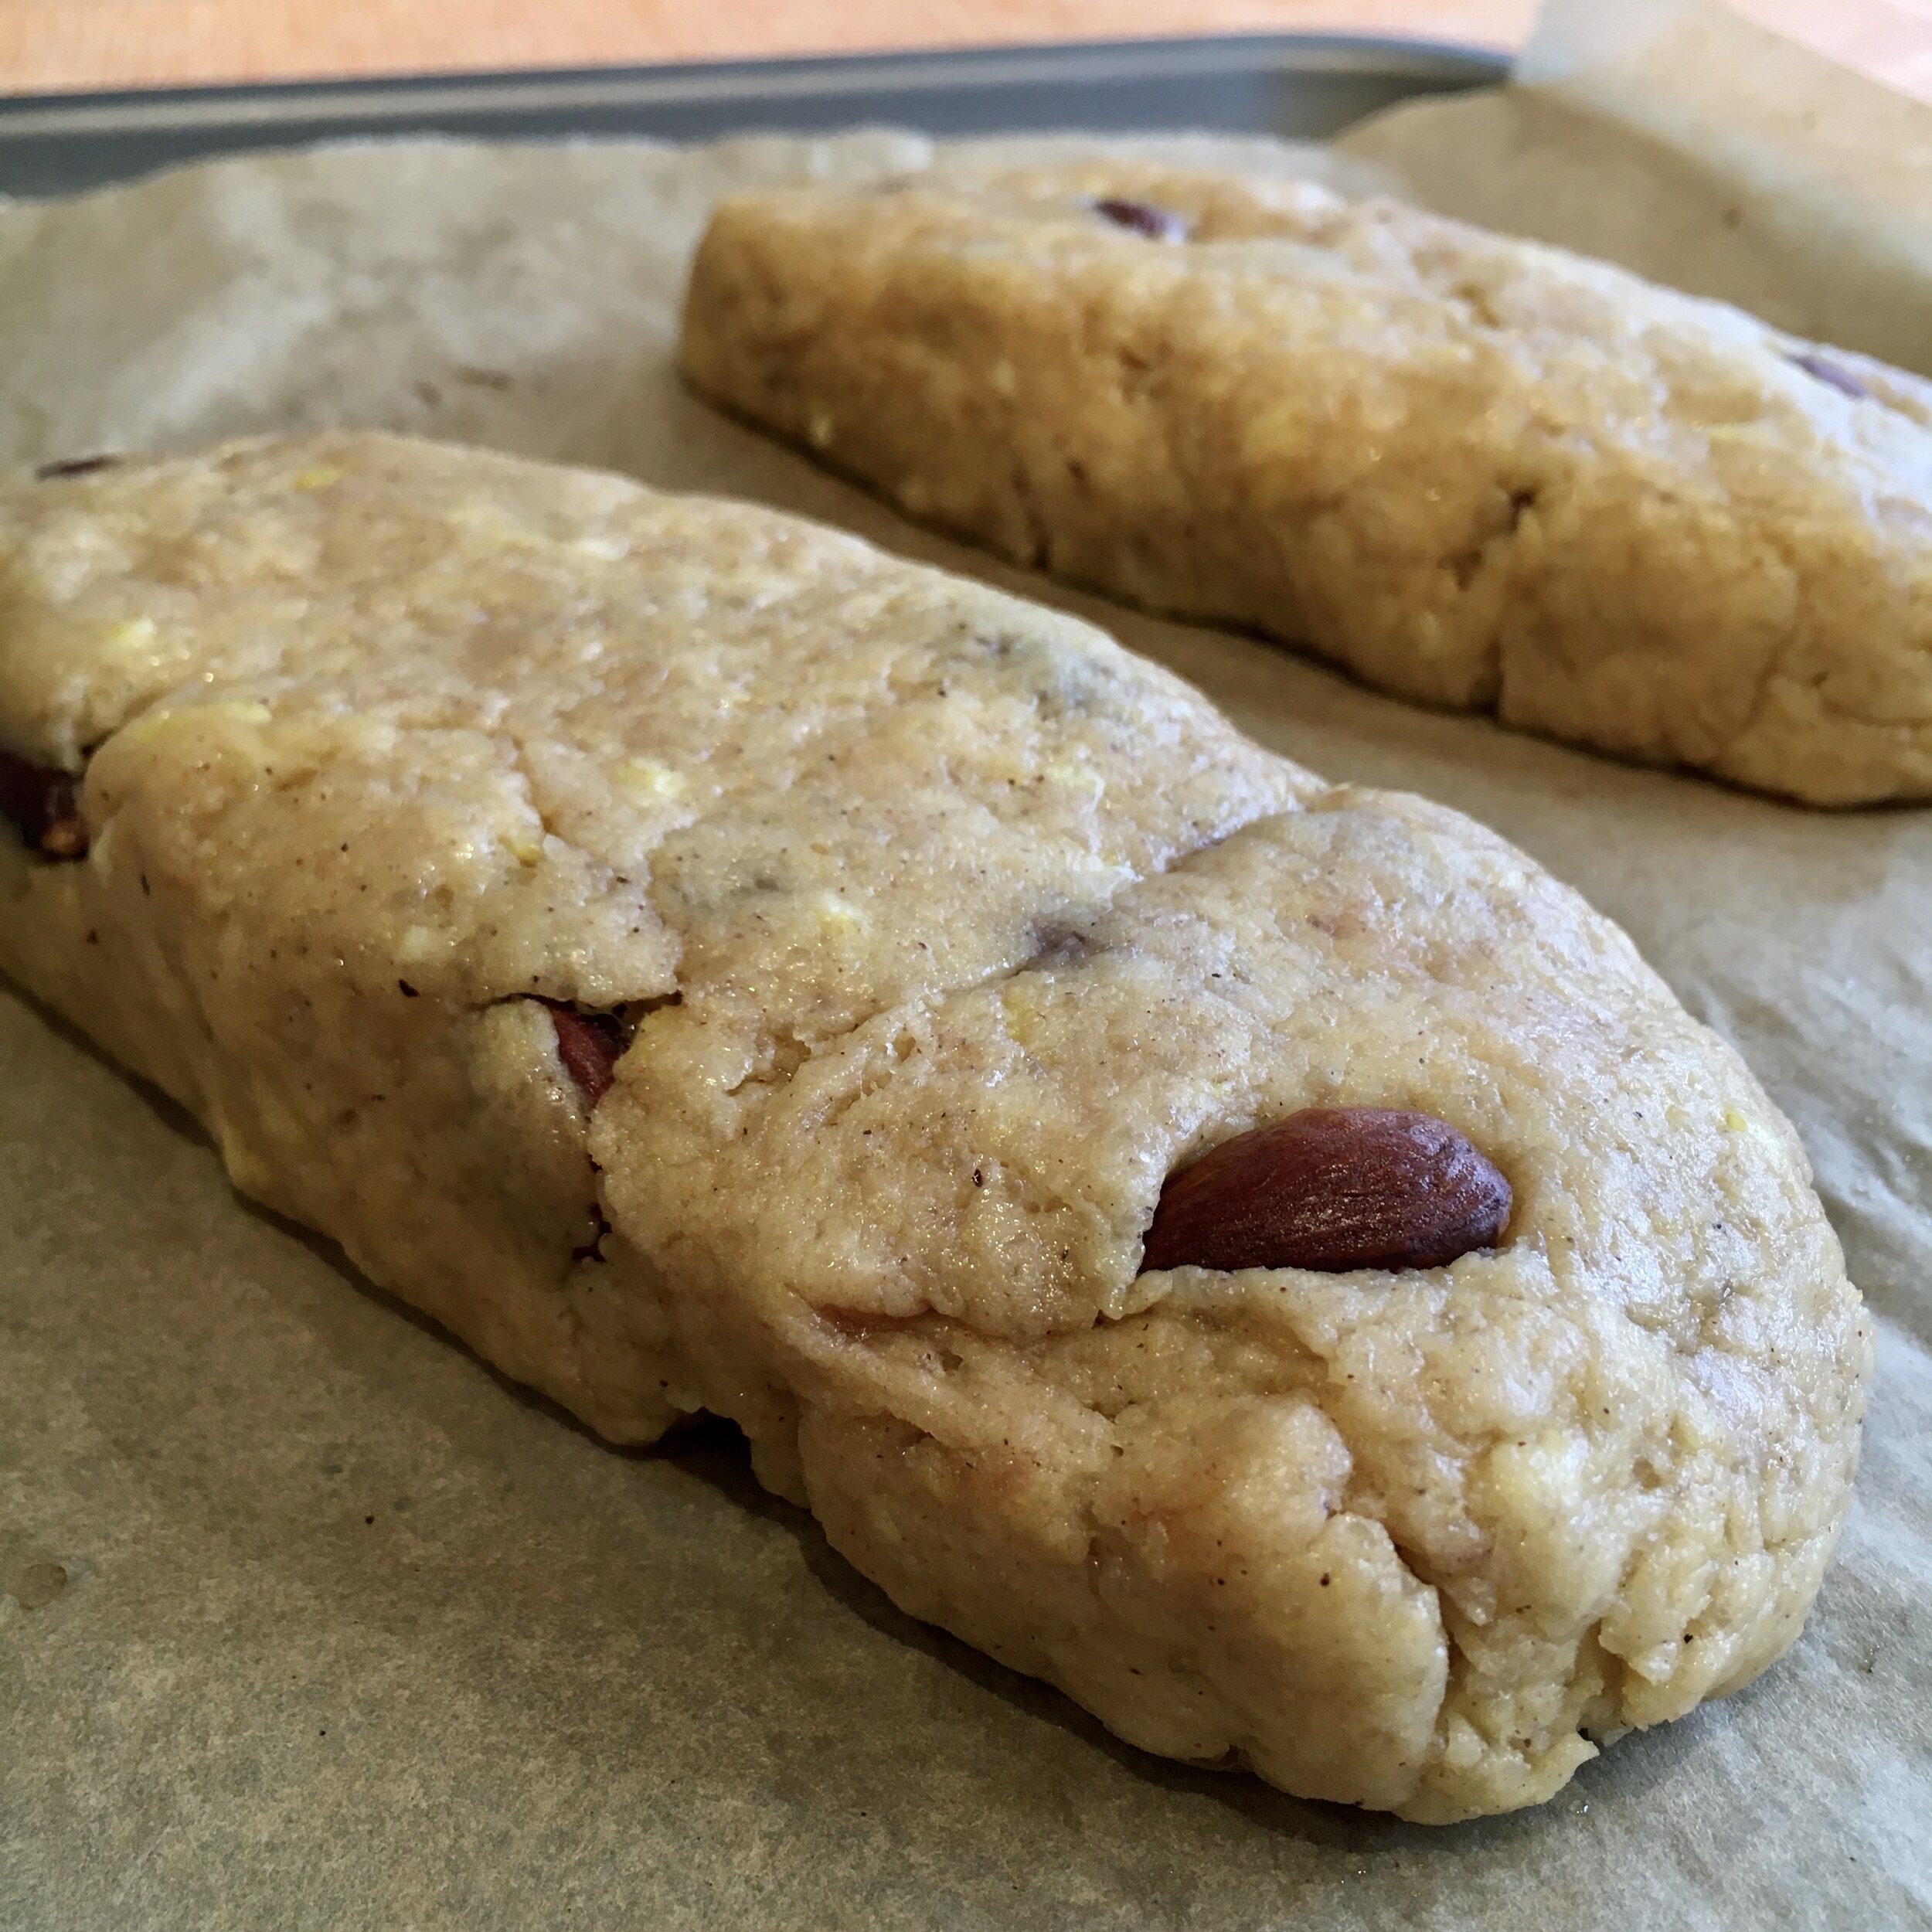
Choco Almond Italian Biscotti
Food is comfort, food is memory which tells a story.
These biscotti della salute (literally health biscuits in Italian) tell the story of my roots and my childhood..each bite brings lovely memories to mind.
These biscuits are a very easy and quick treat to make for all the family and a yummy one too.
They are crunchy and nutty, the perfect combo for my chocolate and roasted almond loving kids!
Ingredients for about 12/15 biscuits:

200gr self-raising white flour
50g self-raising brown flour
1 teaspoon bicarbonate of soda
60gr brown sugar
30gr coconut sugar
80gr roasted almonds
35gr good quality extra virgin olive oil
20gr coconut butter
2 eggs
30gr dark chocolate chips
Preparation: 15 min Cooking: 40 minutes
Start by roasting the almonds in the oven at 180 degrees for about 10/15 minutes. In the meantime mix all the other ingredients in a bowl.
When the almonds are ready let them cool down before adding them to the mixture.
Then you make 2 rolls out of the pastry and slightly flatten them directly on a baking tray.

Transfer the tray in the oven and cook for about 20/25 minutes at 180 degrees.
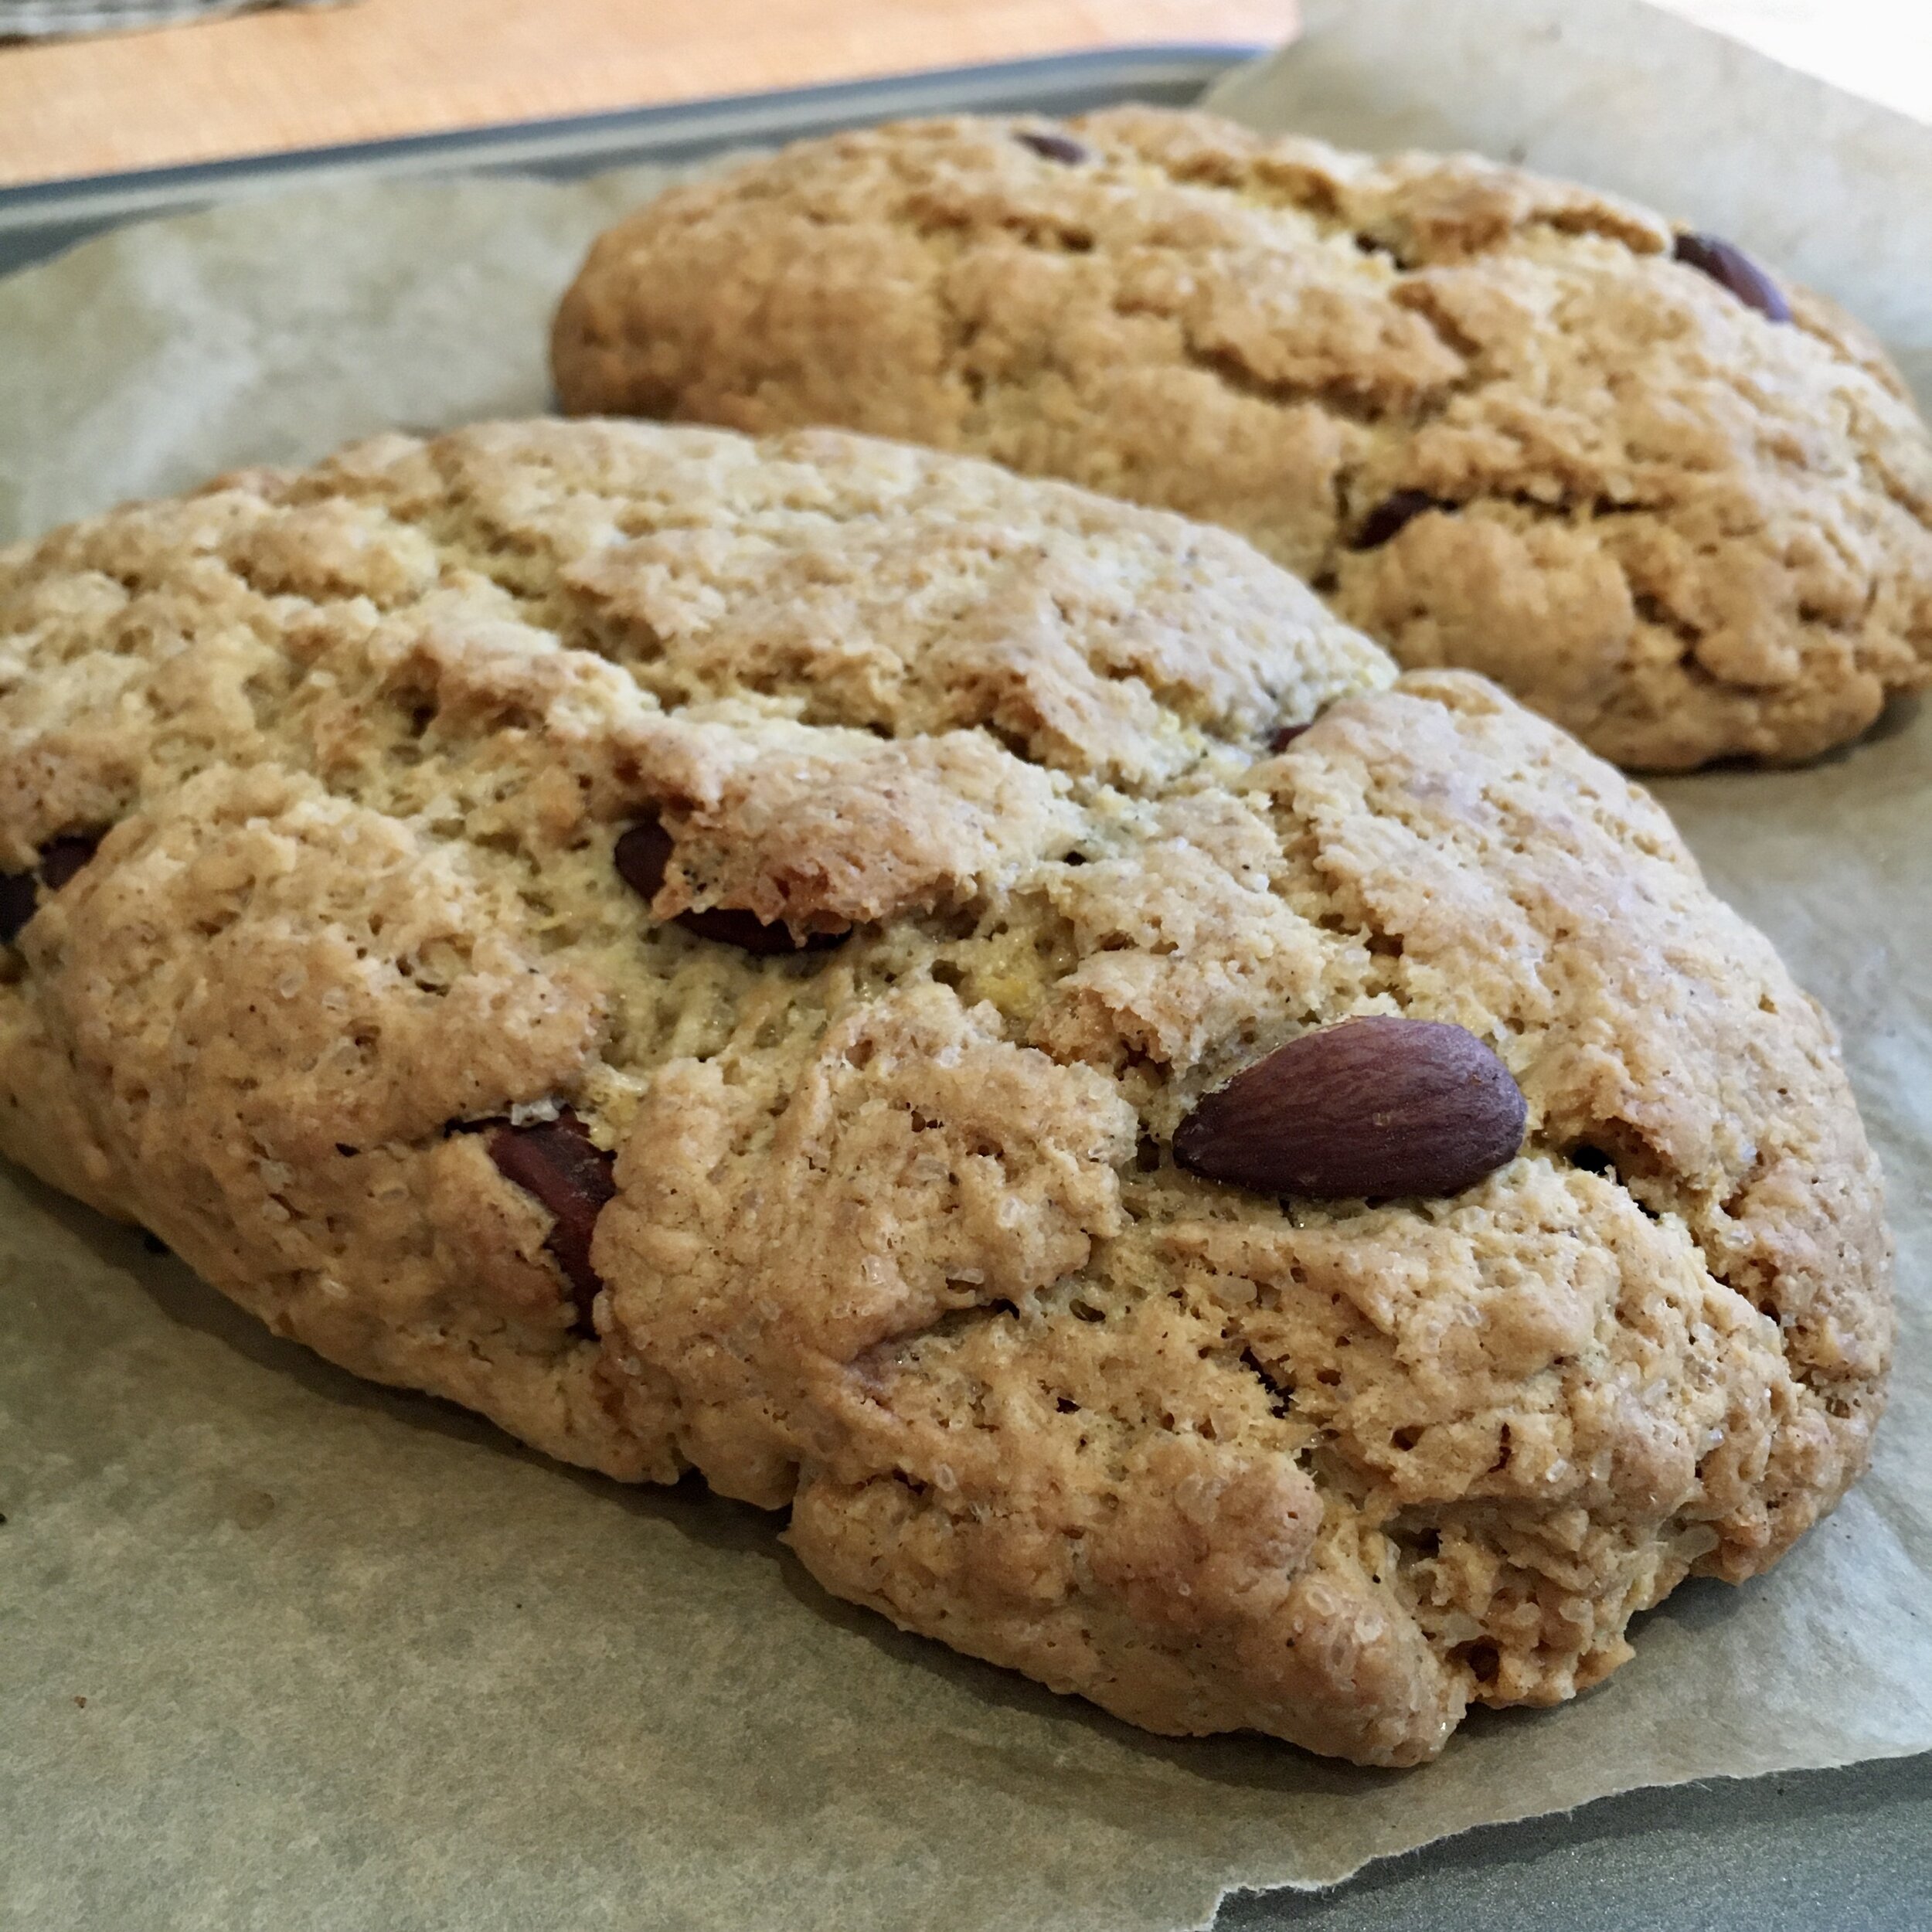
Let them cool down then cut the rolls so to have biscuits about 1.5 cm wide.
Put again in the oven at 180 degrees for another 15/20 minutes or until they are golden in colour.

the yummy biscuits are ready to eat!
These biscuits keep very well for a few days but I warn you! They may be gone in a day like it happens in our house! 😁

Kids love these biscotti!

Crunchy nutty biscuits for all the family!

Lemon, Ginger & Poppy Seeds Cookies
Are you a big fan of lemons and cookies like me? If so then you have come to the right place!
This is a very easy and quick recipe that you can make with your kids too!

Daughter enjoyed making these cookies.
Ingredients for about 15 cookies
2 1/3 cups self-raising flour
1 teaspoon baking powder
1/2 teaspoon baking soda
1/2 teaspoon salt
1 cup coconut butter softened
1/2 cup coconut sugar
1/2 cup agave syrup
2 eggs
zest of 2 lemons
1 teaspoon minced fresh ginger
1 teaspoon ginger powder
2 tablespoons fresh lemon juice
2 teaspoons poppy seeds
Preparation: 15 min - Cooking: 12-15 min
Preheat the oven at 180 degrees and line a baking tray with baking paper.
Mix all the ingredients together in a bowl until you get a nice fluffy dough.
Then out of the dough make your biscuits on the parchment paper.
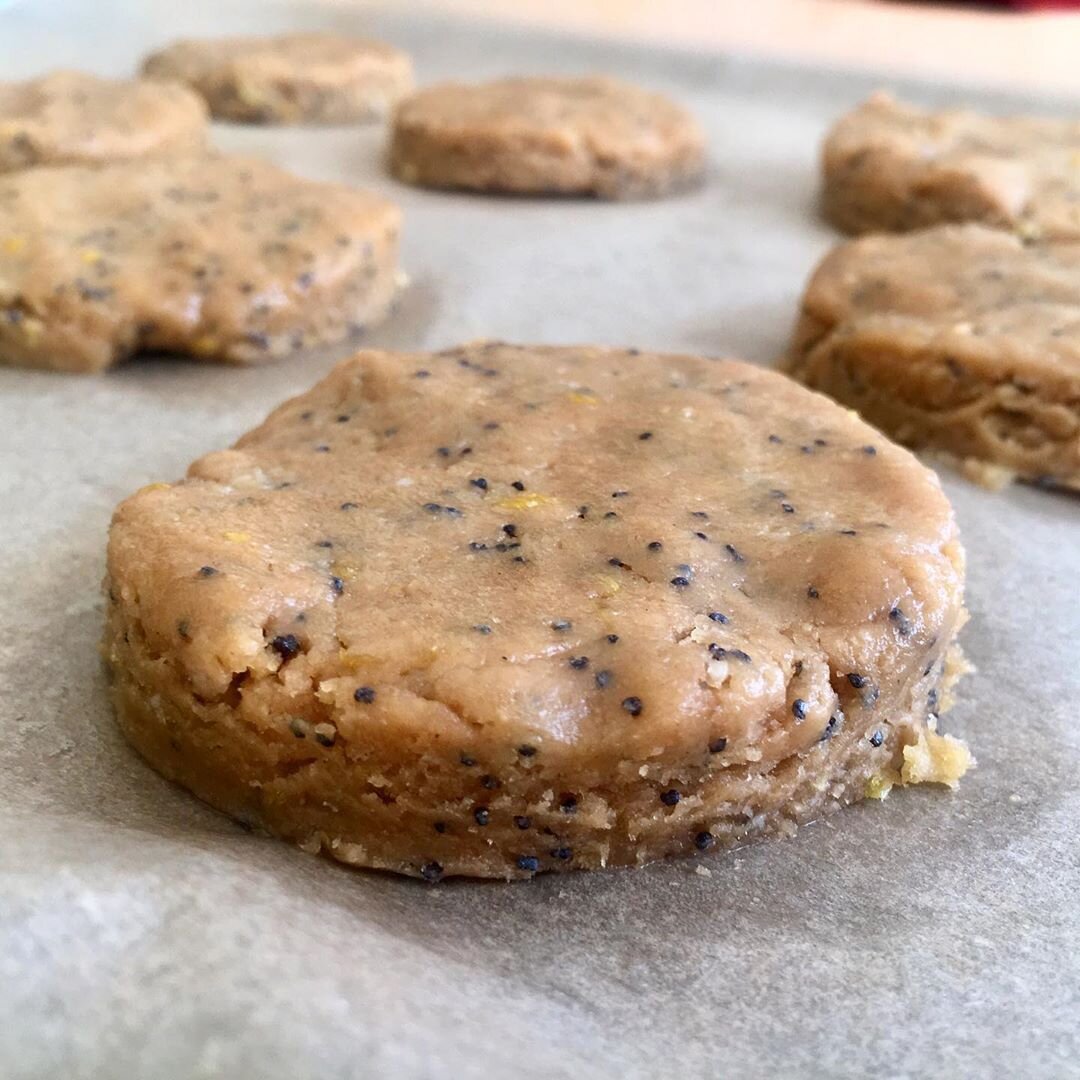
The cookies are ready to go in the oven.
We used a round cookie cutter to make our biscuits, my daughter has lots of fun making them and we all loved the delicious result! 😋
Store your cookies in an airtight container at room temperature for up to a week.
Buon appetito!

Son tries to get one as soon as the cookies are ready!

My little helper is so proud of the final result!

These cookies are full of lemon flavour! Yummy!

Vegan Rum Shortbread Cookies
This was a great recipe for Father's Day cookies!
Our dad loves rum so decided to add some in the cookies Arianna and I made for him!
So delicious! The rum wasn't strong at all, just enough to give a nice aroma! In fact it's a perfect kids friendly recipe too!
Ingredients for about 24 cookies:
200 gr all-purpose flour
50 gr coconut flakes
200 gr vegetable spread
60 gr coconut sugar
2 tablespoons light rum
½ teaspoon pure almond extract
½ teaspoon pink Himalayan salt
Preparation: 20 min - Cooking: 20 min
Mix all ingredients in a bowl. Transfer in the fridge for about 30 minutes.
Then transfer the dough on an oven tray lined with parchment paper and get the little one's help to cut out nice shapes.

Our medal cookies are ready to go in the oven!
We made stars, hearts and round cookies. In particular for the round ones as they were our medals for daddy, we made a hole at the top with a straw.
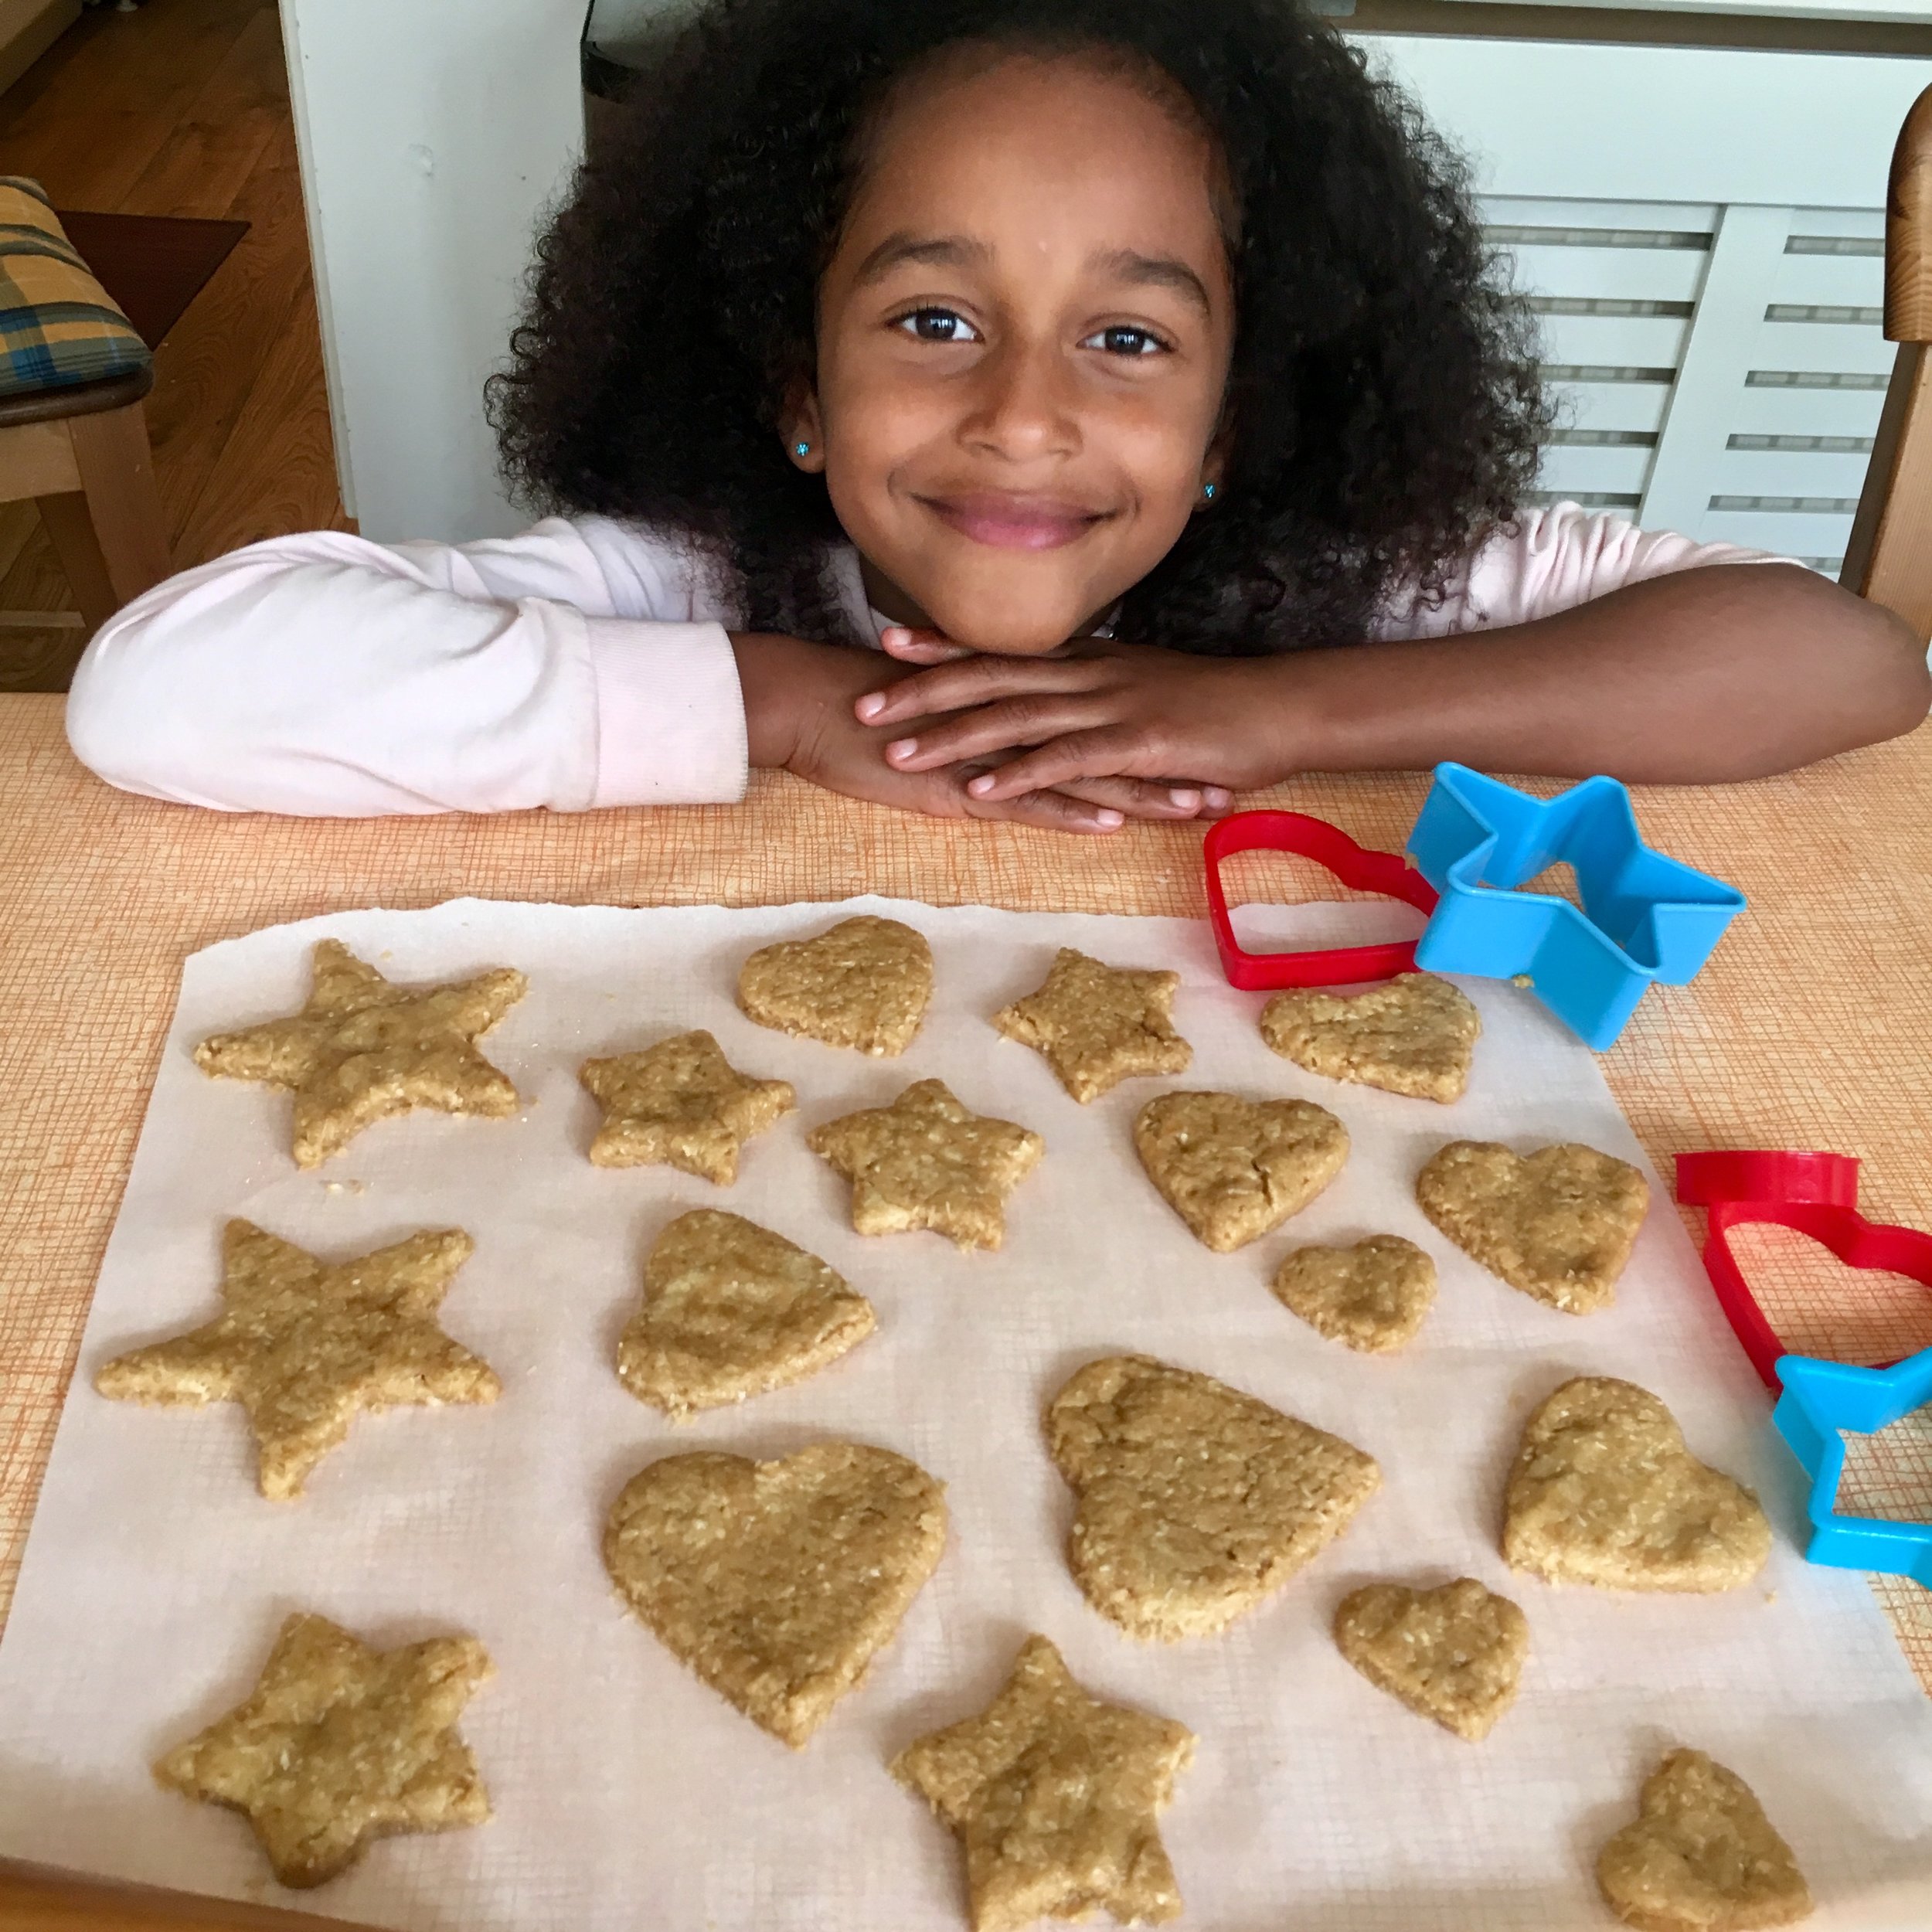
Arianna is so proud of her cookies!
Transfer in the oven and cook for about 20 minutes at 180 degrees.
They store very well for a few days and can be frozen too!
Buon appetito!

Our number 1 medal for daddy!

Daddy is so happy to wear his n.1 cookie medal!

Lots of surprises for daddy on Father's Day! Here our cookie medals with number 1 and dad written on them!

Pineapple and Raisins Paw Cupcakes
After little one’s Paw Patrol party, I got inspired to try out the super cute silicone paw moulds to make fun shaped food for the kids’ lunch boxes.
After making jelly paws for the party, I decided to bake some sweet paw cupcakes.
Ingredients for 24 paws:
200 gr self-raising gluten-free flour
200 gr crushed fresh pineapple
2 eggs
100 gr vegetable spread
70 gr coconut sugar
1 teaspoon baking powder
50 gr raisins
Preparation: 20 min - Cooking: 25 min
Start by crushing the fresh pineapple in the food processor. Then transfer it in a bowl and add all the ingredients except for the raisins. Put the mixture on the side.
In the meantime we use the raisins to fill the toe beans of the paws so that we can have a nice clear pattern once cooked.
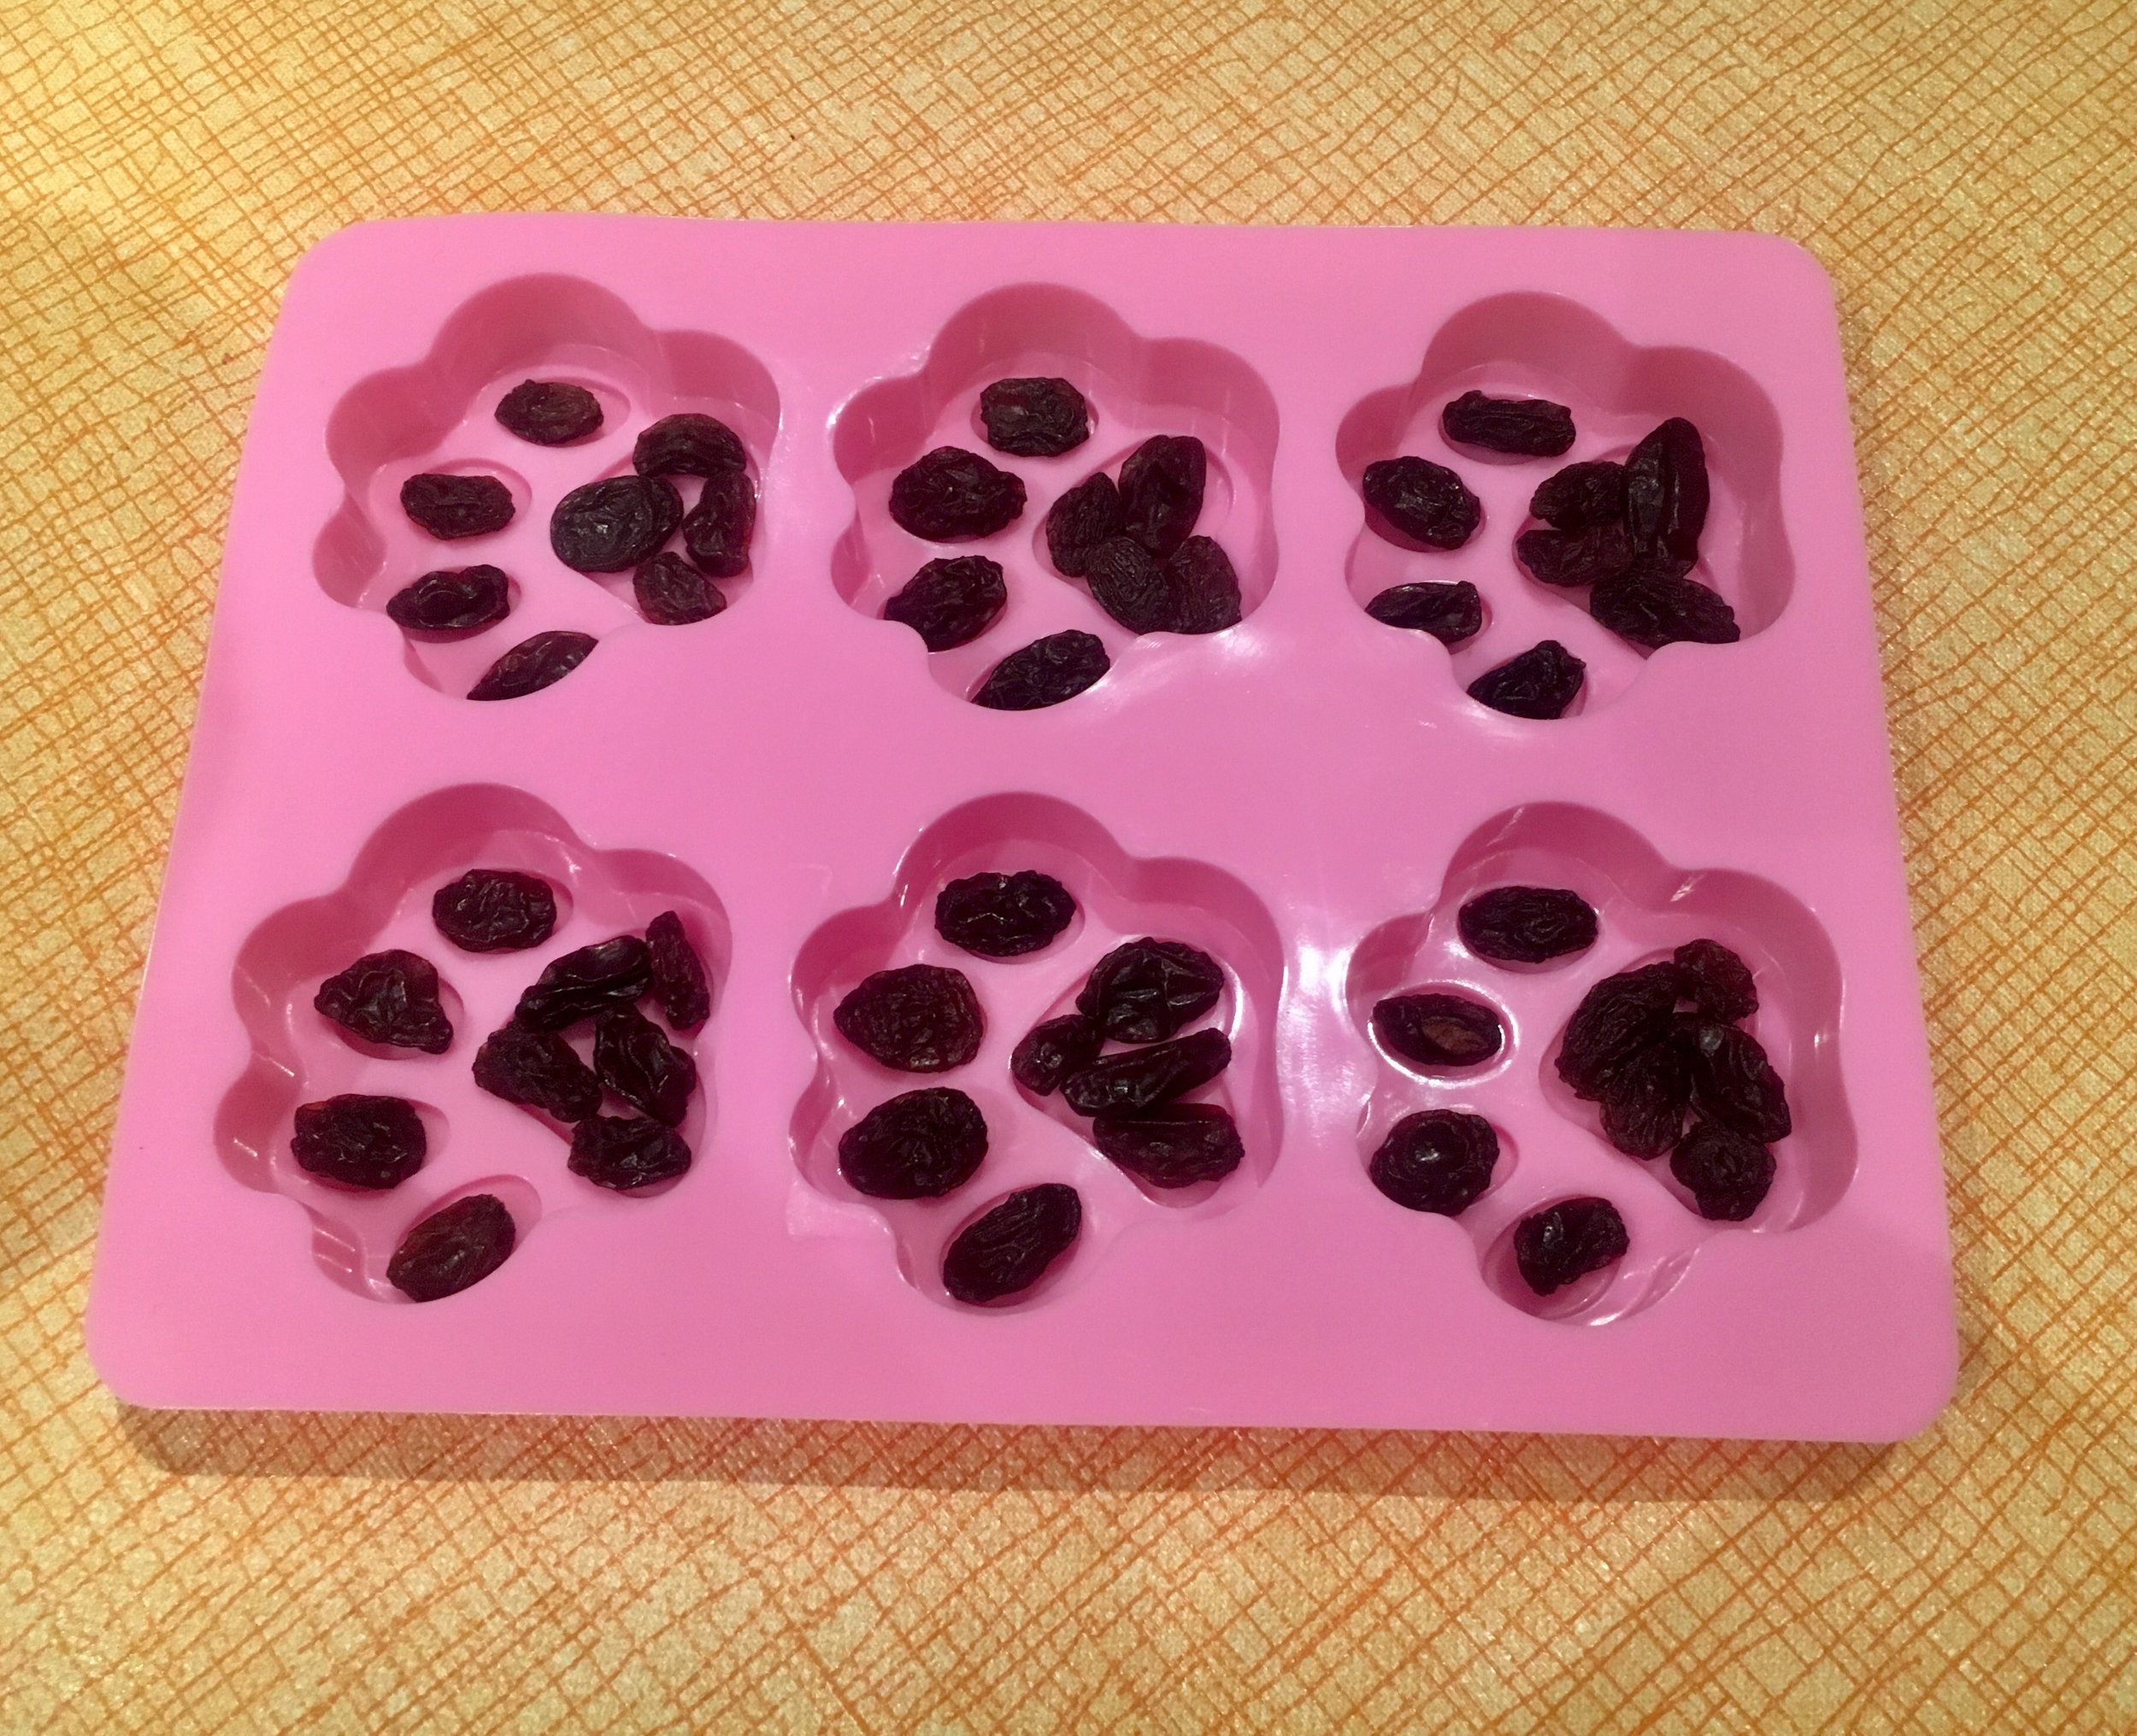
The raisins are placed inside the paws moulds where the toe beans are ☺️
Now we pour the mixture in each paw mould so that it’s filled up to the edge.

The paws are filled with the pineapple cupcake dough!
Transfer in a preheated oven and cook at 180 degrees for about 25 minutes.
They are best eaten warm! However they are still good after 2/3 days.
They are also great for freezing!
Buon appetito!

The raisins and pineapple paws are ready!
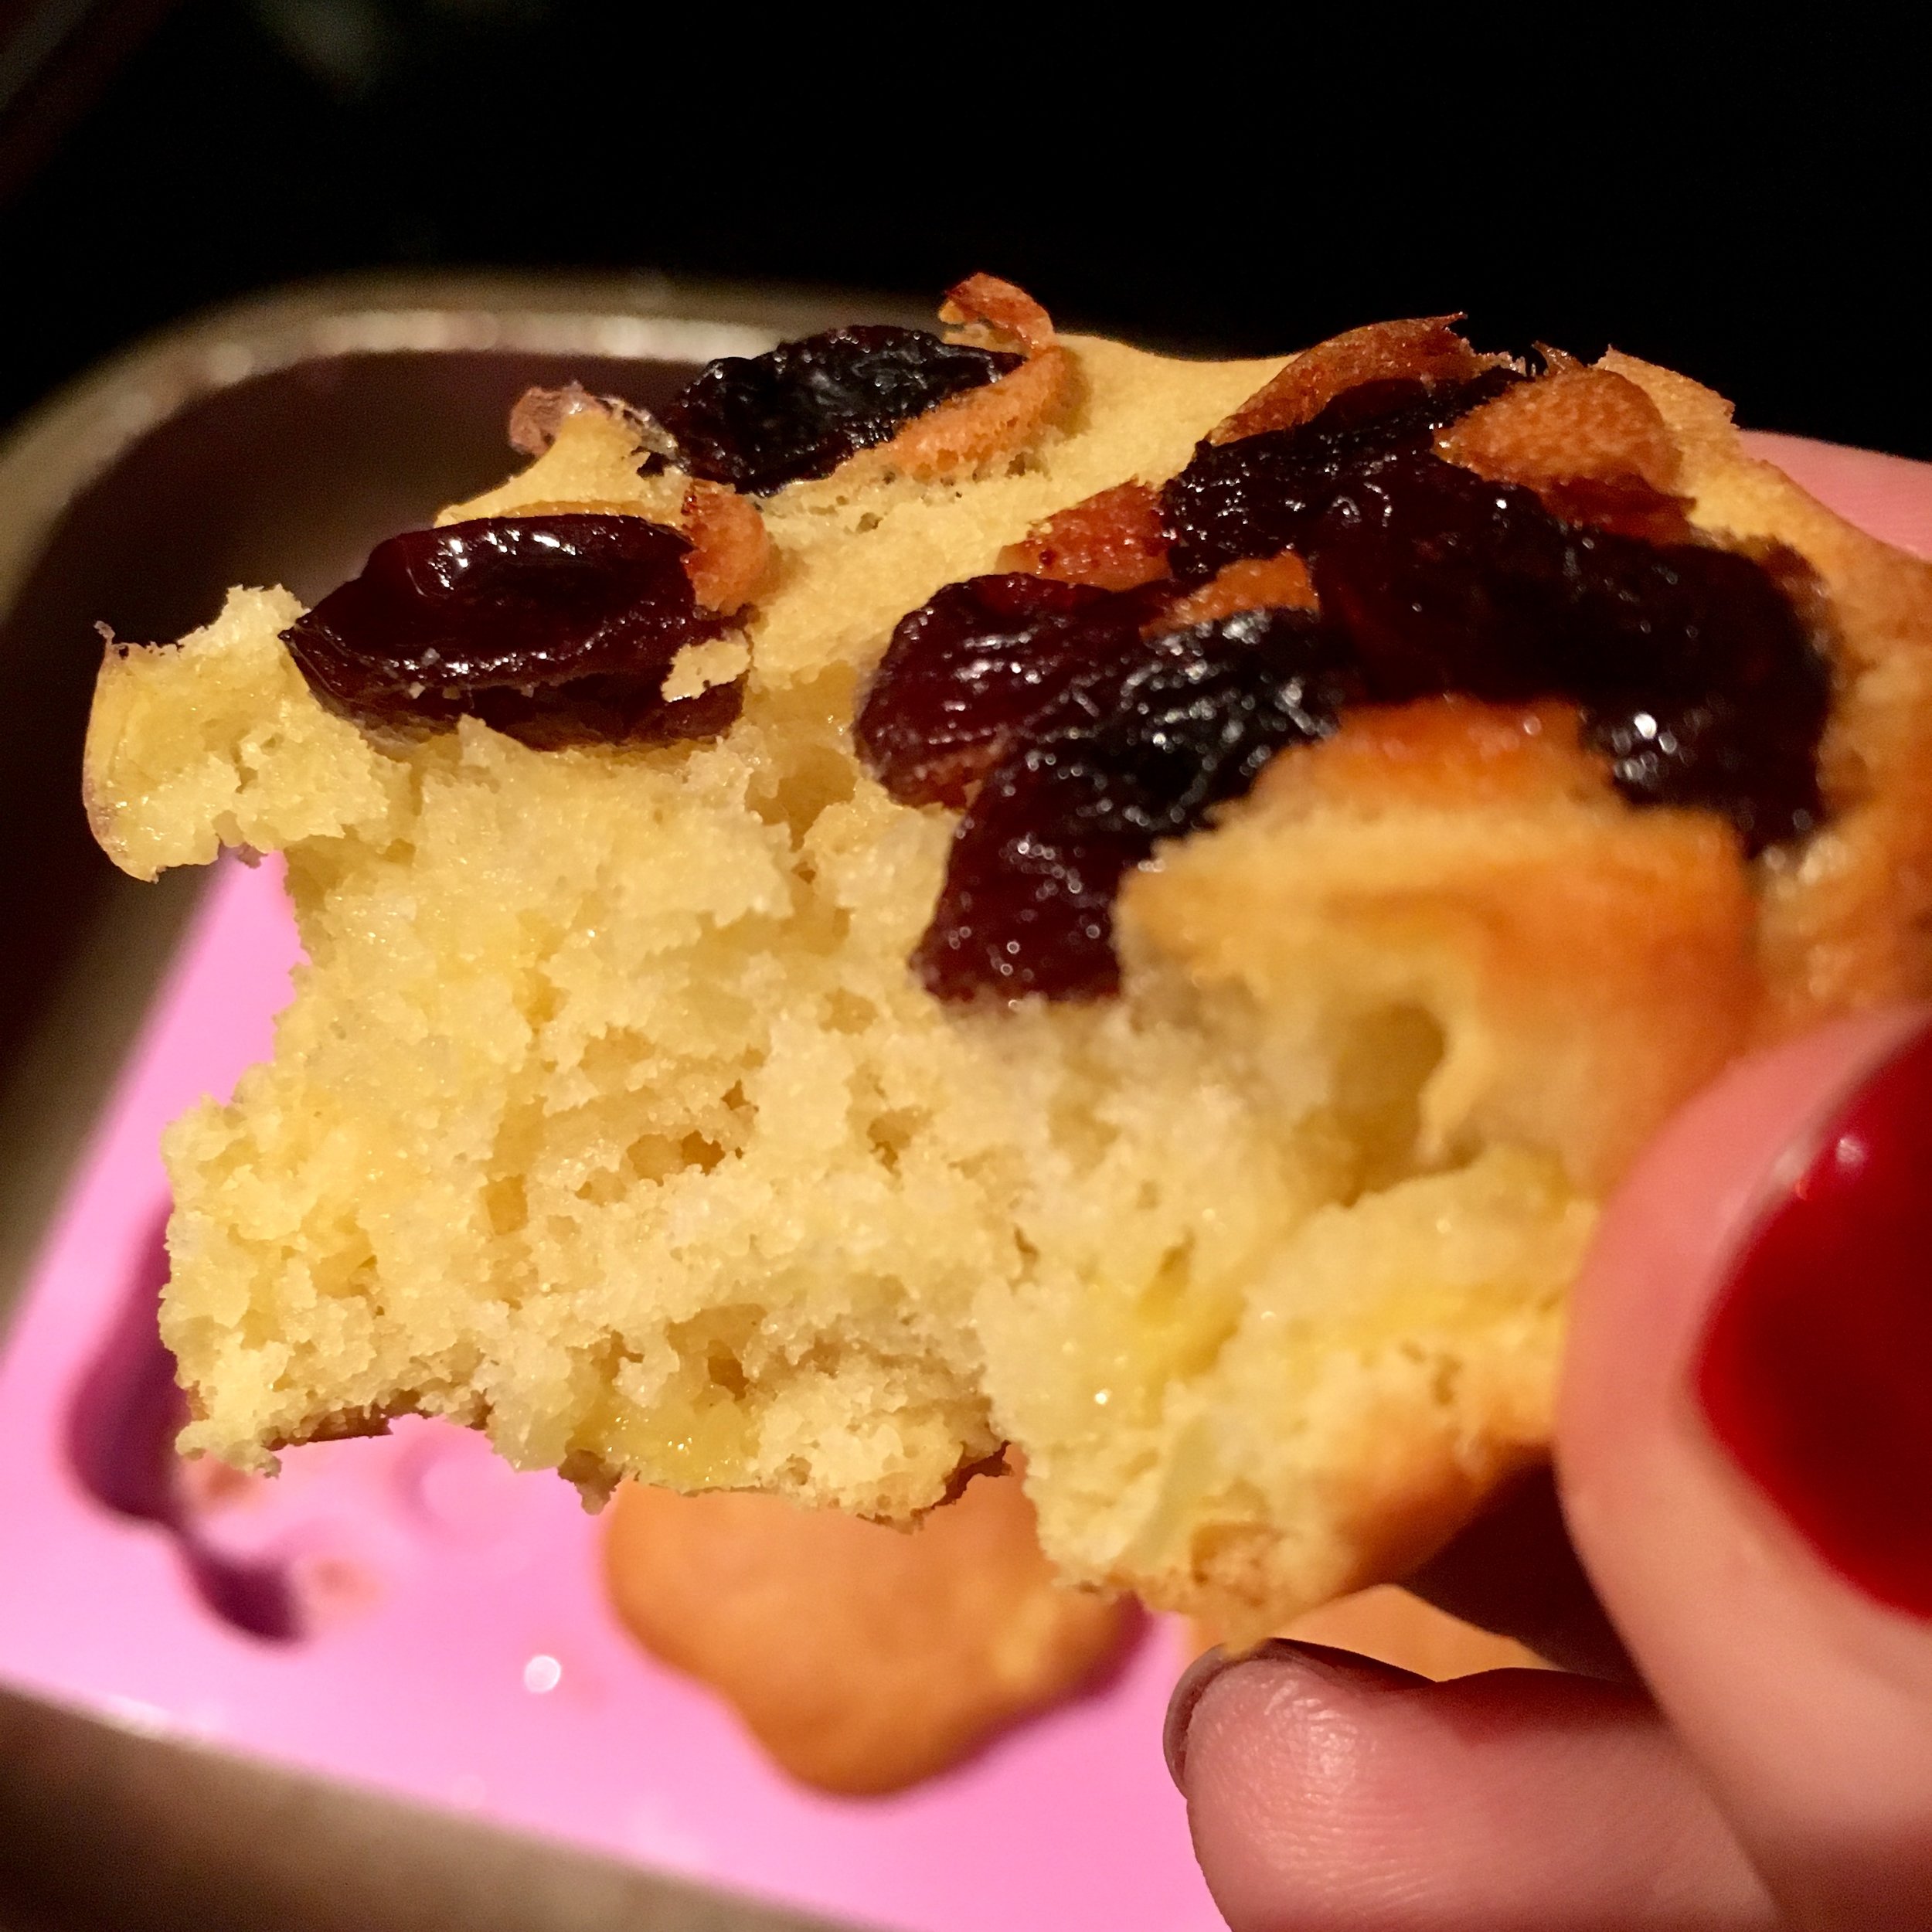
So moisty and yummy! Warm are at their best!

Sticky Nutty Choco Bars
Do you like nuts such as cashews and almonds? The kids and I eat them raw all the time as a snack but we love them even more when they are toasted. So it was time to make another quick nutty dessert!
This recipe requires less than 30 minutes preparation! So easy to make, no baking involved (except for toasting the nuts of course!) no refined sugar added!
A guilt-free healthy protein overload of taste and crunchiness!

Toasted cashews, almonds and puffed spelt.
Ingredients for 8 small bars
1/3 cup cashews
1/3 cup almonds
1/3 cup puffed spelt
1/3 cup peanut butter
3 teaspoons vegetable spread
2 teaspoons Marple Syrup
20 gr dark chocolate
Preparation: 25 minutes
Start by toasting the nuts and the puffed spelt in the oven for about 15 minutes at 200 degrees. Let them cool down.
In the meantime put the peanut butter, the chocolate and the vegetable spread in a cup and place in a microwave for 30 seconds. You will get a nice cream.
Now transfer the toasted nuts and puffed spelt in a bowl, add the choco peanut cream and mix well.
Take a small rectangular tray lined with oven parchment and transfer the mixture in it, making sure to flatten it properly.
Put in a refrigerator overnight or a couple of hours in a freezer would do as well.
Take out of the fridge/freezer and cut in small rectangular bars.
Buon appetito!

Sticky choco nutty bars ready to eat!

Mamatella Aka Mum Homemade Nutella
Hello everyone!
I’m so happy to share with you this incredibly easy yet super creamy recipe of my Mamatella, aka a mum homemade version of Nutella.
The kids and I are all big fans of this famous Italian chocolate spread. I grew up on Nutella literally :-) I cherish incredible memories of long beautiful afternoons spent at my grandparents’ house and having Nutella as a treat. Also my grandfather used to work for Ferrero so they used to have lots of Ferrero products at home and Nutella was never missing!
However mainly after my breast cancer, I’ve become more aware and conscious about the way I eat and what I feed my family with. Healthy eating is an important part of a healthier lifestyle.
So I’ve started exploring possibilities to convert my favourite foods in healthier versions of the same ones without compromising the taste and the joy of eating them.
Nutella was hard to quit but when I’ve come up with my own chocolate and hazelnut spread, seriously I don’t miss it anymore! It’s as good, if not more, super quick to make, healthier and less sugary and kids love it! And me too!
Rich in unsaturated fats, high in magnesium, calcium and vitamins B and E, hazelnuts are good for your heart, help reduce the risk of cancer, and aid in muscle, skin, bone, joint and digestive health.
Raw hazelnuts are a bit chewy and bland in taste so it’s always best to eat them roasted. Their taste get enhanced and they turn incredibly crunchy and flavourful.

Mamatella is ready!
Ingredients for 1 jar of Mamatella:
60gr roasted hazelnuts
60gr coconut sugar
70gr dark chocolate
30gr white or milk chocolate
50ml almond milk
30gr coconut oil
Preparation: 20 minutes Cooking: 5 minutes
Start by roasting the raw hazelnuts in the oven at 180 degrees for about 15 minutes. I’ve used already blanched ones. You know that the hazelnuts are ready when they are fragrant and turn slightly darker in colour. If your hazelnuts are not blanched, they are ready when the skin starts to crack. Let them cool down, wrap them in a kitchen towel and give an energetic massage so the hazelnuts will rub against one other and the skin will come off.
Now grind the roasted hazelnuts. For this I have used my Thermomix, but any food processor will do. 30 seconds at maximum speed. Then add the sugar, another 10 seconds at maximum speed.
Now for melting the chocolate, I do this step directly in the Thermomix as I can set 2/3 minutes cooking at 50 degrees which is enough to melt the chocolate. Alternatively melt the chocolate separately and then add it to the ground hazelnuts and sugar in the food processor.

Fill a jar with creamy Mamatella!
Add all the remaining ingredients and mix for about 1 minute at medium speed.
Done! Mamatella is ready! :-)
When it’s still creamy, transfer it in a jar.
It stores very well for about 8 to 10 days (but normally here it never lasts more than 3 days!) Keep refrigerated and take it out of the fridge 30/40 minutes before eating it.
Buon appetito!
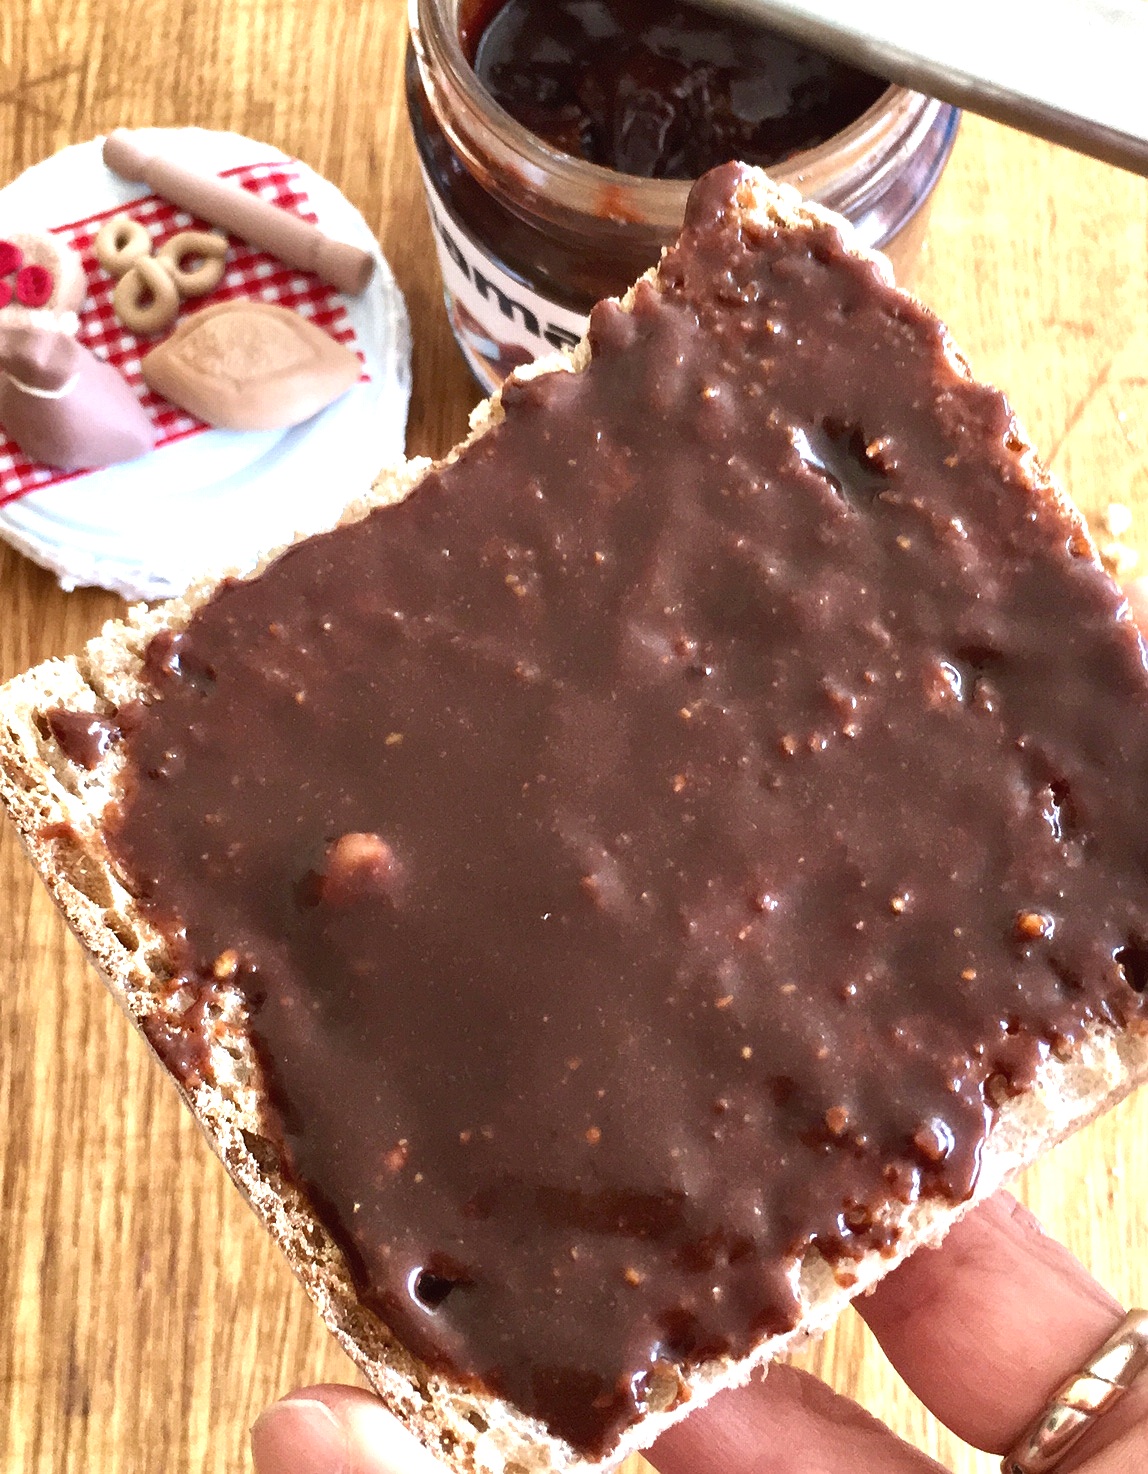
Best serving suggestion is spreading Mamatella on a slice of sourdough bread!

A real success with the kids!